When you have been doing something for awhile, you can easily reach a stage where boredom, lack of ideas, stalemate sets in. Earlier this year I was beginning to feel this way and began looking for other directions in which to take my crafting and renew my enthusiasm - was I a lucky girl because what should come along was being invited to join the Elusive Images design team. However, from the beginning, my aim was to make a blog that illustrated, shared ideas and news of how to get the best use from the Bug, so whatever other elements of crafting appear in the Cupboard, I will always include some an idea, technique on die cutting or embossing. So what to do next????
When I started this blog in Feb 2009, I had no idea where it would take me, nor just how popular and helpful it would be to so many! I have covered many, many subjects and have tried to catalogue them as I went along, but now feel with so many, that many are getting lost as they get pushed further and further back in the Cupboard archives. Since I now have a very extensive guide to die cutting and embossing that is hard to find elsewhere in one place, I feel something needs to be done to simplify finding information, techniques, ideas, and hopefully inspiration!
Over the coming weeks I will be re-organized the Cupboard, it will take me some time and with my EIDT commitment my time is limited. I thought about setting up a challenge, but this would take even more of my time and stop me bringing you new ideas and after all there are challenges out there anyway. What I will continue is my Friday Followers Gallery, and I'll be pleased to exhibit your cards - I know I'm not the only cuttler coming up with new ideas! What I will do is improve my labelling system. Until then you can continue to use the label search facility on the sidebar - not perfect but hopefully it soon will be. I've made a start on grouping together dies by shapes, sizes and manufacturers. I will follow this up by cataloguing any cards, tutorials, or general info that relates to the subject. My idea is that if you have a particular die, and/or you are looking for inspiration, techniques or news - this labelling system will take you there! Since today is my 304th post you will understand the task I have set myself! I know I can rely on your support until I get there - I need you to visit often, comment often on how you are finding things, and of course spread the news of the Cupboard. By just by being there even though my posts may not be as regular as usual will help me make the Cupboard an even better treasure trove of goodies that will help you and new owners of die cutting machines find what that "something"! I can assure you that "something" is there!!
If you feel you have any other ideas, or suggestions that I can use to help and improve the Cupboard, please, please, leave me a comment.
In the meantime, my thanks to you all for your continued support without which I think the Cupboard would not only be a lonely place, but the shelves would be empty! Your enthusiasm keeps me going, so you have my thanks for visiting so often and for all your supportive comments and encouragement.
Now what was I doing? Oh, yes....back to labelling!
Hi
Hi, Thanks for dropping by.
My name is Eileen but to friends in the card making world I'm known as 'ikki'. (which is pronounced I-KEY) From where or how this came about I'm not sure - it just got shorten from my original craft name of Ikemo by various friends along my crafting way! I started crafting whilst recouperating from an accident, and from my first attempts with peeloffs and paint - I was hooked! Now my passion is my BUG! and now BEADING!
In the Cupboard you will find ideas, news, tips and techniques to help you get more from this fab little machine. So come in - join the fun and Cuttle with me!
Pages
Tuesday 31 August 2010
Monday 30 August 2010
Marianne Creatables - Make a border
Last week I showed you a border made with a small leaf die from one of the Marianne Creatables die sets, obtainable from my supplier Make a Lasting Impression (see link on side bar).
PS: I will be back tomorrow with news of how the Cupboard will be changing, hope you will be able to join me and let me have your views. Thanks.
Here is my 2" x 6" Border
Now I have a 2" x 8" Border
to add to my finished card....
Materials Used:
Cardstock: Bottle Green, Sage Green Linen
Decorative Paper: Artylicious CD - Essence of Nature - Misty Dawn
Marianne Creatable Leaf Die
Provocraft Vintage Corner dies
Sentiment, ribbon, scoreboard from stash
From a small die - a big 8 x 6 card!
Since the paper is a beautiful tree design it fits in nicely with the die shapes
and gives the effect of falling leaves!
Autumn approaches - just where has the summer gone?
PS: I will be back tomorrow with news of how the Cupboard will be changing, hope you will be able to join me and let me have your views. Thanks.
Labels:
Artylicious,
Borders,
Corners,
Joy Crafts,
Marianne Designs,
Provocraft,
Tutorial,
Using small dies
Sunday 29 August 2010
Nestabilities - Label 4 - Aternative cuts
Over the past week I have shown you how make 2 alternative die cuts, so why not make it 3!
The Label 4 die is one of my favourite shapes, but you can use it in another way.....
on a piece of card, tape the top of the die
Make sandwich: A / B / Card with taped die cut side down / C
You will notice that the C Plate is only placed on the die where the cut is wanted.
The uncovered part of the die is passed through the machine first.
The cut
Trim down the side and you have a shaped tag!
(When I use this method, I stamp my image first, then cut)
or you can turn the die and have a different shaped tag!!
If you wanted to make an even bigger shape you could do the same on the other edge.
See you tomorrow,
Friday 27 August 2010
Friday Followers Gallery
Hi everyone, today is FFG time and I'm really pleased to bring you this idea as it follows on from my post on Monday and shows just what you can do with a bit of thinking out of the box. On Tuesday, Tracy got in touch with me saying she had used my idea to solve her problem of her dies being too big for her image, and this was the result...
What Tracy did was....
cut a mega curved rectangle, but this was too big for her image, so....
by placing a smaller mega rectangle over the first cut
made a new shape!
AND, I think is a very good shape that will be useful. I do like value for money!
You will perhaps recognize the Butterfly image - it one of the Marianna dies, but instead of using it as a die, Tracy turned it into a stamp! You can check this out by popping over to Tracy's blog.
I love to hear that my ideas can be put to good use, and I'm happy to give credit where due which is why I started this FFG spot. In return, if you use my ideas, I would appreciate you linking back to the Cupboard, that makes the Cupboard more available to others and my efforts even more worthwhile. Thanks Tracy - great crafting.
Thursday 26 August 2010
Tippy Thursday - Making borders
Tippy Thursday again, and today I'm looking at using those little dies that tend to get overlooked!
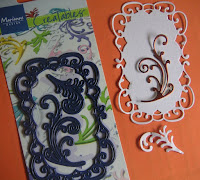
This die is my most recent purchase.
It's from the Marianne Creatables range and consists of 3 dies. The fancy scalloped rectangle and 2 leaves. Stating the obvious - the leaves can be used as leaves, but is there something else you can do with them?
This die is my most recent purchase.
It's from the Marianne Creatables range and consists of 3 dies. The fancy scalloped rectangle and 2 leaves. Stating the obvious - the leaves can be used as leaves, but is there something else you can do with them?
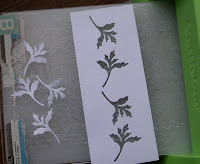
How about making a border......
I make my own cards and have lots of strips of card left over like this...
Using the Bug sandwich: A / B / card / die cut down / C
(All of the die cutting tips I give can be adapted to your own machine, but because I only have experience of the Bug, and feel I don't need tell you what recipe to use, because you will know! BUT, if you do need help - just ask).
From a peice of card 6" x 2" you will have 4 leaves and the die cut strip...now
I have added two scored lines to the top and bottom of the strip, then when placed over a decorative paper...you have a nice little border, which can be adjusted in length to suit your project.
AND, you still have 4 leaves to use!
Time restraints have not allowed me to finish my card....hopefully later I will be able to get it finished!!
Hope you like this idea of using your smaller dies....don't leave them at the back of the Cupboard....get them out and make full use of your of all your dies!
Wednesday 25 August 2010
WOYWW
Hi my WOYWW friends, time to check a few desks to see what you are all up to and, of course, say hello!
There's not a lot on my desk this morning, partly because I've just finished a couple of projects and had to clear a space for the next. I have a little tip to share with you with the label dies soon, and the papers are from the Artylicious CD which I have just bought. I like the idea of being able to print inserts in matching papers and the designs are beautiful.
Now for my bottom drawer!
A lot of you have shown interest in what's in this drawer, partly I suppose because it's always open. The reason for this is it holds my embossing folders, dies, and paper packs which I use all the time and like to have handy. I did a quick count of the dies - I got to 39! and I think some of the CD cases are doubled up!! Oh dear, what a lot of cash tied up in a shoe box!!! I store my paper packs in plastic folders, again handy to see and get at. The rest of my papers are stored in A4 folders in the bookcase, and the 12 x 12's live under the sofa!
Well now it's time to get my hair cut, and then I'll be doing a bit of blogging, see you around.
Monday 23 August 2010
Nestabilities - Labels 2
Do you find sometimes that no matter how many dies you have none seem the right size or shape? This happens to me quite often and it is real frustrating!
On my desk on last week's WOYWW I had a label 2 die cut on which I had watercoloured with Inktense pencils an image from the EI Townhouse Stamp themeplate. Having done to a reasonable, but not entirely satisfactory colouring job, I looked the shape and thought...."now What"! I could not come up with a design that looked right with the shape....so....knife in hand......holding breath.....I cut across the top and bottom of the die cut and ......
and I had a new shape
this new shape allowed me to stamp a scene onto a strip of card, matching up the tree and bush behind the house so that my new shape could be lifted on foam pads to give some dimension to the scene. I like my new shape and think it could be very useful to ring the changes with the Label 2 dies - Wonder if any of the other labels can be changed?.....yet another challenge!
Hope you like this idea, and if you use it - perhaps you would let me know so I can pop over.
Labels:
Alphabet,
Altering die shapes,
Elusive Images,
Labels 2,
Nestabilities,
Tutorial
Thursday 19 August 2010
News of a new A4 Die Cutting machine
I was alerted last week by Anne that Once upon a stamp were introducing an A4 Die Cutting and Embossing system. This is it!
It's not unsimilar to the Bug, but it is BIGGER - it has an A4 cutting platform! The sides fold up and it has a storage compartment with lid. that would be useful. The handle also folds down so when closed it makes a rectangle box. All the plates are included. The machine is from a Dutch manufacturer but no name is given, and Once upon a Stamp have them in stock at a price of £99 including free delivery. There is more info on their site in you are interested, or perhaps on the lookout for a new machine. I have not seen one, and would be very interested if anyone can add any further info. If you live in the Nottingham area, there is a demo model on show at the shop. This seems a better propostion than the new Grand Calibur from Spellbinders!
Wednesday 18 August 2010
WOYWW
Hiya my WOYWW friends, another Wednesday and time to visit some desks.
Here's mine....
Here's mine....
I've been trying my hand at watercolouring with my new Inktense pencils.....have a long way to go!
This is a project I'm working on and hope to have some results tomorrow in my TippyThursday post (can't cross fingers because I have to turn an handle!)
Hope to visit you soon, have a great nosey day
Tuesday 17 August 2010
Provocraft Alphabet - Personalized Cards
One of the most used die sets that I have is my alphabet! I have never made a card that has been personalized with the recipient's name that has not been admired or treasured. Added to this, when struggling for that something different....this could be the answer....
Tommy's birthday card - some lovely decorative paper, a border from the same pack, a ribbon, a peeloff ...
and his name.
This alphebet is Harmony - I only have the one set and have found this adequate for greetings, names or just initials. If you look at my Love and Marriage Label on the sidebar you will find lots of examples of how I've used these dies. I like this particular set because they can be spaced evenly or unevenly, or even interlocked, and with using double side tape - adhering them is easy.
Cut a small square, place DST on the back.
Sandwich: A / B / die cut face up / Card with DST face up over the letter to be cut / B
Using this method you only cut where you need and the DST does not stick to the die.
Always remember that with the Provocraft dies you do NOT use the C Plate - if you do - something will break! I know this - I have done this!
Buying dies is expensive! How many dies do you have that you use? How many sit in the cupboard?
As crafters we all have the tendancy to want ALL...but with the vast amount of dies on the market, sometimes choices have to be made! I realise that I'm always alerting you of new dies and embossing folders, even machines (more about that on Thursday)! I share my experiences and information with you because knowledge if a powerful thing, with it you can make your choices wisely and your dies and folders will pay you dividends, if you don't!
Have a good day,
Monday 16 August 2010
Marianne Creatables
Hi, and a very warm welcome to my blog. Today is what my husband calls "Manic Monday" - yes, he often finds me surrounded by bit of this and bobs of that - in a "shall I" or "shall I not" mood. Today was no exception...but I finally made up my mind and so.....
this is the Marianne Creatables frame that I showed you last week. After printing a PC generated greeting on white card, I offset the frame and ran through the Bug.
In case you are having difficulties with intricate dies sticking to the frame, this is a photo of what remained after cutting, and tapping the frame against my metal waste bin. This serves two purposes, removes the bits and saved hoovering! No problems whatsoever after I'd rubbed a wax candle over the die and buffed it up. Not sure how long the wax coating will last...but for the time being...it cutting fine!
Off setting the sentiment allows space for a flower decoration.
The base card is embossed with a Daisy folder from Joy Too You , and the lovely paper is from Artylicious Echoes of Italy. If you like decorative papers, there is a special offer of papers this week of buy one A4 pack (£4.99) and get one 6 x 6 pack for £1 (usually £3.99) - enter promotional code ARTYPPACK at checkout. Unfortunately, the photo is......bad to say the least....and in no way shows up the paper, so it's back to the camera. As I said "Manic Monday" reigns!
Back later with another photo! PS: a bit better!
Sunday 15 August 2010
Fold Back Card - with part shaped cut out
Well, I have lost C& C Spellbinders pick of the week - wonder where it went?
If you saw the show, Sheena Douglas from Creative Expressions made a card with a fold back front with a part cut label 4 shape. If you liked this card I have a tutorial here of a card that I made in February that will show you how to do it.
Thanks for dropping by, hope you have found something of interest.
Saturday 14 August 2010
Elusive Images - New stamps - Christmas
Friday 13 August 2010
Friday Followers Gallery
It's Friday Followers Gallery time. Today the card I'm showcasing is from Kathleen Mc.
Kathleen has used one of the Frills border folders to great effect on this card, the border background makes the lovely stamped image pop. Thanks Kathleen for sharing your clever idea with us. If you have not met this talented crafter over on the Docraft forum, and would like to know more about this card, why not drop by her blog and say hello.
Thursday 12 August 2010
Tippy Thursday
Over the last few weeks there has been news about Spellbinders Nestabilies new dies - BIG dies as well as more labels!
For the big dies you are going to need (would you believe it!) a new machine called the Grand Calibur
due for release in September. There are a few video available to view and you will find details on Spellbinders. I have to admit to an interest in this as it takes card and paper up to 8.1/2" x 11", but what a pity not 12". Wonder if Provocraft will be going this way too? I'm thinking it would be good to be able to make one's own shaped cards in a larger size but on the other hand - an expensive purchase! Just where do you stop???
As for news on the Spellbinder dies, Create and Craft have a Spellbinder's Pick of the Week on Friday, their prices are often on the high side, but it might be worth a look! My supplier Liz, (link on the side bar) will no doubt be cheaper and also worth checking out.
My new die this week is again from Marianne Creatables......
Isn't this pretty!
Well back to my craft desk......lots going on that I will be able to show you soon. If you live in Northumbria, Friday and Saturday are open days at Graphicus - what an interesting visit that would be, if not you'll just have to pop in on the Cupboard to see what is going on because I'll be keeping you informed! Since it's Friday the 13th....anything could happen!?!?!?
Message: Nessie - I have replied on your blog re your problems of getting the Marianne dies cut out of the die. To anyone experiencing this problem this link may : help
Labels:
Marianne Designs,
Nestabilities,
Rectangles,
Tippy Thursday
Wednesday 11 August 2010
WOYWW
Good morning my WOYWW friends from a very bright and sunny North Staffs, hope you are all well and enjoying life. When I walked into my craftroom this morning and looked at my desk ....
I was surprised by the lack of anything to show you but the remains of a very busy time crafting yesterday. I made two new DT cards which are under wraps, and so because of this I thought you might like to see....
this illustration from the set of EI stamps that my Pie (on Monday) was from, which many of you liked and thanks for your lovely comments. Stamping is a relatively new adventure for me, and having a colour guide is really helpful.
This is my take on the boot from the same set.
I've used the Nestie squares for layering the paper from HOTP over gold card and a patterned vellum. Although the shaped labels are lovely, the basic shapes are really useful, so don't leave them gathering dust. The boot I coloured with Promarkers, cut out, triple embossed. A few gems on the tassels, twisted wire, ribbon, foam pads - job done. Oh, not quite - the lines were achieved by using a score board - this matched up nicely with the diamond pattern on the boot!
Enjoy your day visiting - this week I hope to be with you earlier!
Labels:
Elusive Images,
Nestabilities,
Squares,
Stamping,
Triple Embossing,
WOYWW
Subscribe to:
Posts (Atom)