Hi

Hi, Thanks for dropping by.

My name is Eileen but to friends in the card making world I'm known as 'ikki'. (which is pronounced I-KEY) From where or how this came about I'm not sure - it just got shorten from my original craft name of Ikemo by various friends along my crafting way! I started crafting whilst recouperating from an accident, and from my first attempts with peeloffs and paint - I was hooked! Now my passion is my BUG! and now BEADING!

In the Cupboard you will find ideas, news, tips and techniques to help you get more from this fab little machine. So come in - join the fun and Cuttle with me!


Showing posts with label Christmas. Show all posts

Monday, 5 December 2011

Using your borders in a different way

Once I make a start on Chrissie cards I find all sorts of things that have been packed away since last year and my mind goes into overdrive thinking I must use these this year?!?!?  
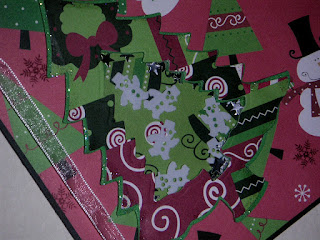
Many of my bits and bobs I like, so I 'm making a big effort to add them to cards.  Bet many of you have just such a stash!  Another thing, I just do not want to buy any more stamps or dies at the moment because I have other beady things that I want to spend my cash on.  BUT, how to make the old look like something different and new!?!!??  There's one way to make a border - can you guess which border die I used?
This is the die.   It's a Nestie borderabilitie.  It cuts on one side only and then you have the option to emboss the pattern.
 
But I've made it into something different.  To make the shape I cut two strips of paper from straight edges, turned them round and fastened them with tape, then added a strip of ribbon over the join.  Different and it gave some creative satisfaction! AND, I used some old embellishments, old paper stash from Basic Grey, ribbon that's been in the box for at least three years. 

Now what else can I use?????  
Back soon, happy crafting,


Monday, 3 October 2011

Christmas Cheer

Another card using the new Chocolate Baroque Christmas stamps called Christmas Cheer.....

If you would like to view these stamps check out this link or pop over to the CBDT blog and have a gander at what my teamsters have been up to  - I've some super talented crafters to work with and their art makes me think and keeps changing my outlook on crafting, but then that's how we progress!
 

Monday, 26 September 2011

New Christmas stamps from Chocolate Baroque

This week see the launch of new Christmas stamp sets from Chocolate Baroque.
The DT have been working with these stamps and have produced some stunning pieces off artwork for your inspiration and each day this week you will be able to view a new card over on the CBDT blog. 

This is one of my cards using the stamps from the Fat Robin theme plate...
If you would like to know more - pop over to the CBDT blog  (link on my sidebar) for full details.  

If you would like to view this set of stamps - click on this
link. They are a delightful set of stamps to work with! Robins, holly and christmas trees...my favourites!

Monday, 13 December 2010

Nestabilities - Tree Shaker Card

Today I have used my last years Nestie Christmas Tree dies to make a shaker card.  The design has changed slightly this year - it's more rounded, but it would  do the same job.

You need:
Card 6" x 6"
Nestabilities: Tree die ( largest and the medium )
Acetate
Fun foam
2 Decorative papers
Decoupage strip foam tape
Small shapes

Cut 4 of the largest tree (2 decorative paper, 1 acetate, 1 fun foam)

With the medium die, cut out the centre from 1 of the decorative papers and Foam.

With double sided tape add acetate to the DP.
  then fix the fun foam to the acetate.
Add strip of decoupage foam tape to back of the fun foam.
Add your shapes in the space created.
Add the last piece of DP to cover the space.

When added to your card......


I think my grandaughter will love this!
You could also use this method to make other shapes. My Dahlia  flower would look good!


Wednesday, 24 November 2010

Nestabilities - Squares, Snowflakes and Crfts 2 U folder

My tutorial today is based on Nestie Squares and finding a different look.

To make this card you will need:
A4 Cardstock: Cream Hammer
Decorative paper
Nestabilities: 2 large classic squares (size 4 & 5)
                    2 Create a Snowflake dies

Crafts 2 U: Snowflake embossing folder
Gems, ribbon

Base Card:  cut a 6" strip from the A4 cardstock and centre crease.  Place the embossing folder to the centre crease and emboss.  With scoreboard create two lines to finish the pattern.  I have debossed the folder so that the inside of the card is more interesting.

Place the smalliest snowflake die in centre of the plain panel (low tack tape will help hold it in place) and cut out.  Reposition and make two further cuts. Save the cutouts.
 
Cut a strip of DP and add to the inside of your card.


The embellishment:
Cut l square from the largest die in a matching cardstock to your decorative paper.
Cut l Cream square from the smaller - you can cut this from the strip left over from making the base card. 
Cut another of the small squares from the decorative paper used on the inside of the card. 

From the cream square - cut out the snowflake and add the decorative paper behind, then layer on coloured cardstock....

You will see I have used one of the cutouts from the base card and a red gem in the centre of the snowflake.
With a red gem added to the centre of the small snowflake cutouts your card will look like this.....   


As I said yesterday, an easie peasie card, but classy.  AND, a great way of using those leftover bits of decorative paper that you just cannot bring yourself to throw away!

Hope you like this one.   If you use the design and blog it, I would apprecaited you linking back to the cupboard - I started the Cuttlebug Cupboard to share my experience and knowledge with you - please help me to share it with others by spread the word.
                                                                           

Monday, 22 November 2010

New Stamps - Family Christmas and Earth Spirit

This week sees the release of  new stamps sets from Elusive Images.   Earth Spirit  and Family Christmas.

You can  view the Family Christmas stamps  here.    AND, by clicking on the gallery tab on the same page you will be able to see the artwork created by all of the EIDT.   If you would like to see which of the artwork is mine, you can go to gallery section on the sidebar, and click on my name.   As with all EI stamps, the quality and value is superb, so working with these stamps was a real pleasure and I hope our work will inspire you with your own Christmas crafting. 

Tuesday, 16 November 2010

Nestabilities - Squares

I think the basic squares are soooo useful, and can be made to look different if you can conbine it with other  square shapes. 

Here I have cut a red large classic square, then with a smaller big square scallop die, cut out the centre to make a frame. If you want the stamp the edge of your square, don't do as I did - stamp before you cut!

With another square of decorative paper behind the frame you have.....
You will notice that I have embossed only part of the Craft-2-U snowflake folder straight onto the card base and added two lines to finish the pattern.  At a busy time of cardmaking, this is a useful technique!

If you have not done this before, my tip is to place the folder on the card where you want the pattern to be embossed, then place the second B plate on the edge of the folder and guide the uncovered back through first.  If the folder should mark the card, THE LINES WILL COVER THE IMPRESSION.   Scoreboard scores again!

Monday, 15 November 2010

Spellbinders Octagon Nestabilities

I'm beginning to get my head round the fact that Christmas is not that far away and I need to start making a few cards.  I had this idea for a quick card to get me going......

I cut  2 dark green octagons from the largest scallop die and a smaller white plain octagon.   On one of the green scallops, I ramdomly stamped a few swirls and snowflakes in silver, covered with clear embossing powder the heated. 

On the other piece of dark green ( the back ) I did this....
made a line and folded.  Now the two pieces can be joined with a strong glue.

Next I embossed the white shape with the winter scene folder, and embossed the edge with an embossing pen instead of putting through the Bug again.  With  a touch of distress ink in bundle sage round the edge and a sentiment stamped in the same shade, all that was needed was  a bit of  glitter, a ribbon, a star, and a few foam pads.


The card stands up well and is certainly a quick make.
Thanks for dropping by, 

Saturday, 13 November 2010

Hi my friends, I send you all greetings and my very best wishes on this World Kindness Day!
A day to say thank you for the kindness you have shown in caring and thinking about Dave and myself over the last two months when life was painfull, and difficult.  Your kindness in sending messages from all over the world has been a great comform and very much appreciated by us both.  I hope on this day that life is well with you and yours and that kindness surrounds you.  There is a saying "little things mean a lot!" - how true we have found this to be!! 

It seems that I have not been posting a great deal of crafting or tutorials of  late.  One reason, although being on the EIDT is a fab experience and I'm enjoying the challenge, it is time consuming and because we are producing samples of new stamps I'm not able at the time to share them with you.  So, I was very excited to learn that the new Family Christmas stamps are being released soon and you will be able to visit the gallery and see what we have all been up to!?!?!?

In the meantime I thought you might like to see one of my Christmas cards made with EI stamps 


I have used 2 sizes of  mega rectangle dies - one larger stamped, coloured with distress inks and Promarkers and then triple embossed.  The smaller embossed with the Swiss Dots folder.  The circle is another Spellbinder die stamped, coloured and guess what?  Yes, triple embossed.  Although these dies may have been about for a long time, they are still useful aids to crafting, and by combining different dies you can certainly make interesting cards!  Have you looked at your old dies recently?  Have you tried combining different shapes?  Have you any interesting examples to show me?  Would love to hear from you! 

Thanks for dropping by, kind regards, 
 

Monday, 8 November 2010

Back again and thinking of Christmas

Hi, I'm back to crafting after a lovely few days in Llandudno.  The change did both Dave and I the world of good, but unfortunately as you do, I did too much and so when I returned home I was really off colour again.  BUT, things are improving - my bruising has nearly gone, the pains from my dent have also gone as long as I don't do much, but I soon get out of breath (lol - a big change for me)!   We were very lucky to go last weekend the colours were just beautiful.  This is Bodnant Gardens - 10.30am, peaceful, calm, quiet - just after a short shower - boy was I glad to be alive!


Now down to some crafting - my granddaughters and friends were so pleased with thier Halloween boxes, that I thought I'd make a Christmas Advent Box Calender for them! 
So with some help from my little elf  Dave, we've made a start - he has taken to crafting a treat and so far we have made 50 tops and 30 bottoms - nearly there! But, then so is Christmas!!

Thanks for dropping by, I'll by back soon with some news and tips.
Take care and enjoy your day!


Saturday, 7 August 2010

Joy Crafts - Crafts Too You - Elusive Images

Remember this....it was  my post on Monday illustrating my diamond Joy Crafts die and the Christmas Greetings folder from Crafts 2U. 


Well I added a Mince Pie.....coloured with Promarkers


Then I added a few more......embossed in gold .....sat them on a border of green

added another gold border.....and now there are......


six!
  
Oh, joy  - mince pies one of the goodies that come with Christmas! 

This little stamp is, of course, from Elusive Images, and I have others from the set to show you...soon.

Hope you are all having a good day.   


Monday, 26 July 2010

Crafts Too You embossing folders

Hi, today is the 26th July and in 6 months time it will all be over!  Yes, I'm talking Christmas.  As a rule I never start making Chrissy cards before October, but since I showed you the new folders from Crafts Too You last week, and some many readers showed an interest I thought I'd better put my festive hat on!
This is the 5" x 5" Crafts 2U Dots embossed on to a 6" x 6" card, and you cannot see the join!

This is one of the sections of the Crafts 2U Christmas Greetings - there are 6 in all.
They emboss well - this is on a glimmer card.

My first CC card for 2l10

All I've added is a Snowflake made with a Nestabilitie Create a Flake die. 
Very simple, easy to do in a hurry, but nevertheless .... you tell me?

This is a very quick post, just as my card.  Yesterday I was out all day playing bowls, sad to say our County lost to a better Dudley & District side, happy to say I managed to win my own game.  Time is flying and I'm really busy preparing something special !?!?!?   Tell you soon.....

Today is my mates Chrissie's birthday, so pop over and send her your best wishes as she has not been feeling well.   Happy Birthday Chris, hope you have a great day!


Saturday, 6 February 2010

Stamptacular Sunday Challenge

Gosh, how quickly the week goes by!   I so enjoyed the challenge at Stamptacular Sunday Challenge last week, winning was even sweeter!!  This week's task was a Blue and White Winter Scene. I have never made a Christie card so early....but then there's always a first time.....so


The strange thing about this week's challenge is that last Saturday I bought these tree stamps....thinking....perhaps men's cards, or sympathy, but definitely not Christmas. What a coincidence is that! This card was meant to be!!

Since the Cupboard is dedicated to embossing and die cutting you might be wondering what this card is doing here. But, I have actually been able to use a die to make the moon. I cut the smallest circle from the large set and used it as a mask. The colour shading I did with Distress inks - a technique I'm attempting to conquer. Thanks for a challenging challenge SSC.

Friday, 15 January 2010

Cuttlebug Cupboard - Follower's Gallery

Well here we are at Follower's Friday again!  How time flys when you're having fun with PC's and Snow!

Today's card in the gallery is from Rica. Heather is an old blogging friend,and a very talented crafter. She always says she struggles with just White cards, but not with this one - Girl, you did real good! Drop by and see some more of her work - you will not be disappointed.

Not only is the colouring superb, but what creative use of the Fleur de lis Pendant die....

By twisting the pendant and then adding 4 of the smaller dies to each corner - you have a larger square! Nice one Heather - good thinking!

Wednesday, 23 December 2009

Merry Christmas to all

To all my crafting friends


When you creep downstairs on Christmas morning, I hope you find Santa has left you lots of lovely crafting goodies!


Wishing you all a very Merry Christmas and a Happy New Year.


Tuesday, 15 December 2009

Spellbinders - Shapeabilities Create a Flake 2

On a very grey day I have a bright, cheerful card for you made with gorgeous paper and the Create a Flake die.
For the card:
Spellbinder Create a Flake Dies
5.l/2" x 5.1/2" Card
paper
Gems

Having covered the front of the card with your paper, (I continue the paper over to the back for a neat finish), you are ready to make your flake
Such a pretty and useful die!  You can use all 5 dies together or on their own.  They emboss well, and on this card had another use - cut-outs.


So, you not only decorate the front, but also the inside.  Cool!

Another quick, but impressive Christmas card, courtesy of the Spellbinder's Flake.  Not forgetting the lovely paper which I managed to cut into for once!  Alas my stash is now minus one, but on the bright side I can buy another to replace it!!   Always look on the bright side - sounds a good motto for 2010!!!  I will try - what about you?