Hi

Hi, Thanks for dropping by.

My name is Eileen but to friends in the card making world I'm known as 'ikki'. (which is pronounced I-KEY) From where or how this came about I'm not sure - it just got shorten from my original craft name of Ikemo by various friends along my crafting way! I started crafting whilst recouperating from an accident, and from my first attempts with peeloffs and paint - I was hooked! Now my passion is my BUG! and now BEADING!

In the Cupboard you will find ideas, news, tips and techniques to help you get more from this fab little machine. So come in - join the fun and Cuttle with me!


Friday 30 April 2010

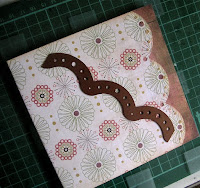
Hi, I managed to finish my card, but unfortunately the light is very poor today - so a not so good picture, but thought I'd post anyway.  Where has the sun gone?  We've had grey skies all day and lots of rain! 

Nestabilities - Labels 4 and Doodle parts
Papers: Basic Grey
Image and sentiment:  Creative Expressions - Birds and Swirls

Now I'm off to celebrate Dave's birthday  in Northumbria where we'll be meeting our daughter and family.
Pity the weather forecast is wet and cold, but hopefully they will be wrong, but then again it is May Bank Holiday!
Whatever you're doing, have fun and enjoy....I'll back on Monday to show you what was in the Black Box!

Thursday 29 April 2010

Tippy Thursday - Cuttlebug, Nellie Snellen, Embossing folders

A few questions received from visitors to answer today: 

Sylvia:  The embossing folder of the Tree is from - Crafts Too   - Leafy Tree   Ref: CTFD3005.  It's out of stock with my supplier on the sidebar,  but  you could follow the link and ask  Liz if she is expecting any or can get one for you.  Her stock is very reasonably priced and you will not get better service anywhere. 

Diane: The Cuttlebug is becoming more popular in the UK, mainly I think because of the size, and hopefully my blog has helped spread the news! In the States it is BIG for such a little machine.  The Bug is made there by Provocraft, but you can get it in many UK stores for around £55.   Some of the newer models are pink, but I still perfer my green version.  In all my clutter, the colour makes it stand out and I really would not like to lose it!

Betty:  No, I have not tried joining squares at the corners, but I might....soon!  Thanks for the idea.  Also for your info that the Nesties dies cut felt which doesn't surprise me as I have cut foam, voille and  material with them.  Your felt flowers are lovely with the machining detail.

Nellie Snellen Dies:  I have been told that some machines find cutting these dies difficult.  If you are experiencing probs it may be worth trying this sandwich:  A/C/Die cut side up/Card/B.  You can also try cutting the die off centre on your plates if  these are bent!!  And, running through a couple of times.  I would be interested to know if any of these tips works for you.  Likewise, if you have no probs at all!  The NS dies are lovely and between us we can find the best way to make them work.

Have a good day!

Wednesday 28 April 2010

WOYWW

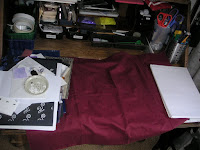
Hi, not a lot going on craftwise at the moment and my desk is reasonably tidy considering I'm trying to finish one card. 
You can just see my bottom drawer - since I'm a lazy crafter, I find this the most handy place for my embossing folders and dies - cause I can reach them without moving my chair!  On the right -  folders containing pad of papers.
a few new goodies waiting patiently for me...
and a couple of freebie jars.....I wonder what I could put in them? Funny how free things have an appeal!

I've had probs this morning uploading images from my PC - it seems that Google in their wisdom have changed the system from easy to complicated!  Anyone else experience this?

See you later - have fun noseying around WOYWW. 

Tuesday 27 April 2010

Thoughts on Tuesday - Label 4 Nestabilitie Dies

Do you play with your crafting goodies and then do nothing with them?  I do this experimenting a lot with distress inks and stamping...and then after playtime they seem just bits of coloured card with no where to go!  So, what to do with them???? I save them for?!?!?. And, I admit I have a box full just waiting there.....sometimes I look in the box take them out, and then....put them back.  However, today when I was thinking I must start a card for a vey special person in my life who has a birthday this week,  and looking for inspiration - but finding none..out came my box of bits...and PING...I found something...
This was a scrap  left from a gone wrong card, which I'd coloured with various distress inks and stamped with an image from Sheena Douglas' Birds and Swirls set (Creative Expressions).  The Labels 4 Nestabilies die may a great shape round the stamping.  So......

after cutting and embossing the edges

Sandwich for embossing:
A / die with card inside cut side up / tan mat / 2 shims (check your machine you may only need 1) / 2 B plates

To lift the edges of the die cut, I inked with DI's and then emboss with a clear embossing powder.  The sentiment, which I also embossed, is from the same set of stamps.

This is one piece of card that I'm pleased I didn't throw away!


Now all I have to do is finish my card. 

See you tomorrow at WOYWW. 

Monday 26 April 2010

Nestabilities - Jumbo Scallop and Big Scallop Squares

I thought I would really go scallops today.....

so using the Jumbo scallop border to make a decorative edge, layered  this over a DP from Basic Grey and covered the base card.  Then   embossed  and distress inked the edges.

The second scallop on my card was made using the other Jumbo die in the set.  Again emboss  edges and then stamped over with background stamp from PB.  The die lends itself to a ribbon tie!

The third scallops on my card.......Big scallop squares.....glittered (not my usual style!) and set at a jaunty angle.....
Although I love my Promarkers for colouring floral images, I find animals more difficult but couldn't resist having a go at this cute image!

Bye for now....have a good day!

Saturday 24 April 2010

Nestabilities - Big Scallop Squares

Hi there, I thought I would show you my finished  Big Scallop Square card....


The colour has been changed with DI's  - the DP is Basic Grey -  the image an inchie from Inkadinkado that has been triple embossed.

Just a note to say......  
Hope you all have a lovely weekend and enjoy whatever you are doing!


Friday 23 April 2010

Friday - It's Followers Gallery time!

I'm absolutely delighted that my blog is proving popular all over the world, so today the card that I'm putting into my Followers gallery was created by Jocelyn who lives in Melbourne, Australia.  Jocelyn (aka JoBear2)
has recently made the decision to start her own blog....so why not pop over there and give your support to our Australia friend.  You'll not be disappointed for JoBear2 is a talented crafter, and it good to see how others from different countries used the same tools, and we all need new ideas and inspiration to keep our crafting fresh.  Welcome to the Cupboard Jocelyn, and it's a pleasure to have your card in my Followers Gallery.  

I thought this a lovely fitting card for a difficult occasion  - thanks for sharing Jocelyn and for supporting the  Cupboard.

If you have a card that you would like to have in the FFG - please leave me a message. There are two conditions for entry - your card must follow the Cupboard principles of always incorporating embossing or die cutting in your crafting and you must be a follower of the Cupboard.      Look forward to hearing from you.

Thursday 22 April 2010

Tippy Thursday - Nestabilities Big Scallop Square Dies

After such a busy day yesterday blogging, I thought I had better get back to the Cupboard to check the shelves!  Now what can I share with you today?

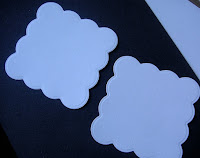
On my desk yesterday I had a new set  of the Big Square Scallop Large dies from Spellbinders....when I get new dies my head goes into over-drive....I could do this...I could do that....but what about....I'm sure this happens to you too!  In the end I thought - use the shape to make a shaped card.  Sounds logical and I have done this before with circles, but this time I used the die differently.....

Cut two of the largest dies and emboss the edges.  This shape lends itself to embossing with a embossing pen, you just hold the pen upright and push and drag the pen  into the curves.  Tip:  Always rub the  pen on a candle first it - then it glides better!  I know there are others ways to grease the pen, but I perfer this....


now you make a score line on the back piece of your card

and with double sided tape join the two together

You now have a 4" x 4" scalloped shaped card. 

In the past I have cut shaped cards by placing one edge of the shape slightly over the centre fold, but think this idea, which I saw Dawn Bibby use on her last CD, much better.  When I use someone else's idea, I like to give credit where due, so thanks Dawn for the tip. 

This size card makes a nice thank you, a gift card, a just to say card.  The smaller dies could be useful in scrapping as mats, embellishments, or journal notes.  Endless possibilities AND, not to be forgotten is that although they are a Big Scallop die - they do match your Classic Squares and Classic or Petite Scallops. 

Now all I have to do is decorate my card!  See you tomorrow. Have a nice day!

Wednesday 21 April 2010

WOYWW

Good morning WOYWWer's.  The sun is shining here in North Staffs, but it's cold and the bird bath is frozen over!  Just the kind of day to stay in and look at desks!  Here's mine......

quite tidy and the reason is that after my two cards on Monday and Tuesday I couldn't move or see anything and then another parcel arrived - so a clean up it had to be and I started again as you can see doing some colouring for my next project.  Only problem was I could not get my printer to reduce the size of the digital image - it did before so I'm a bit baffled!!!!  In my parcel were two new sets of dies - the Jumbo borders and the big scallop dies, also invested in a distress inks tool and a couple of the new colours of DI's - Forest Moss and Bundled Sage - oh I like them, not a little but a LOT!  Hawk-Eye, Julia our beloved leader will notice also my failed image lurking in the background.  Do you ever get that feeling that you should stop NOW, but don't?  Well I got the feeling, but DIDN'T - result SCRAP!

Now last week I was accused of being a teaser - afraid this week is no different.  I have removed the red cloth, but the project is still under wraps, to be precise.....
in the black box on the shelf out of reach and safely stored for ????? cannot say, but soon!

Just above my desk

two lovely cards received from friends.  One of whom I hope to meet on Sunday at a County bowls match in North Derbyshire. Whatever the result of the match, I can't lose - I'll get to meet another super blogging friend.  Thanks Julia you made this possible with WOYWW.  So, if you want to join the fun and make new friends - the link is on the sidebar - come on over, and we'll see you there!

Tuesday 20 April 2010

Cuttlebug embossing and Nestabilities

Tuesday's thoughts found me looking at this card that I had just made...


Paper crafting enables us to make cards for all occasions, but one of the most difficult to design is the one that says you are sorry to hear sad news.  You want to show you care, but are not sure of what to say!   

I often use the words "Just to say", and on this card I've used the image of a Pansy.  The meaning of the pansy is "loving thoughts".  The two must surely be meant for each other!

Is colour something you think about?  I looked up the colour Purple and found this bit of interesting trivia.

"How the color purple affects us physically:
Uplifts - well the pansy certainly uplifts the spirits at this time of the year!
Calms the mind and nerves - offers a sense of spirituality - Yes!
Encourages creativity - an ideal colour for us then!

With a sense of mystic and royal qualities, purple is a color often well liked by very creative or eccentric types and is the favorite colour of adolescent girls."  Wonder if they know just how predictable their colour choice is? - they do like to be soooo different!   What does your colour choice say about you?  Me, well I think I must have been in a very sad, reflective mood when I made this card....
 
On a lighter note....see you around WOYWW!
 

Monday 19 April 2010

Nestabilities - Labels Large and Small

My Monday tutorial is based on the Nestie Labels.  I have both sets of these labels and they can be very useful for layering and mats.  Today I will show you how I made a mat with two papers!

For the card:
5 x 7 card (tent)
2 or 3 decorative papers
Nesties Labels x 2
Penny Black image
Nesties - Doodle Parts
Flowers, gems, ribbon, leaf punch

I started by colouring my image to match my papers. 

I covered the base card and inked the edges.  Then cut a strip from the second paper and added to the card.


Cut two labels - one full and one part label.  Emboss edges.  Using the straight edge of your strip you can line up the mat and image.

A few flowers, leaves, and gems together with a swirl and you have....
an image  with a two tone mat.....
I thought you might like to try this little twist with the label dies.  You could of course use this idea on numerous shapes - your dies are your oyster!

Have a great day whether you are crafting or....whatever!


Sunday 18 April 2010

Cuttlebug embossing and stamped tags

Today I have followed my own advice to pick a paper before starting to colour anything!   
I knew I wanted to make a tag and use a new stamp, but in the end used two tags and 4 stamps.  Distress inks enabled me to shade the tags to the DP's.  Two years ago I never stamped, but these days I have to admit an addiction, add Distress inks, inky fingers and I'm happy! 


The top layer of the flower was made using a Provocraft die, which I embossd with the script folder for texture. 

Have a great Sunday.

Friday 16 April 2010

Cuttlebug Embossing and Nestabilities Squares

How nice to be able to make a card for a lovely lady celebrating her 90th Birthday! 


I do seem to have a tendency to use the Swiss Dots folder, but it lends itself to so many images and creates that simplicity and classy look that I like.  On this card I've also used the Vintage corners and the numbers from the Harmony alphabet.  When die cutting small objects I place double sided tape on the underside of my piece of card and the die face down on top.  Once cut this make attaching the pieces much easier.  The image is a digi from Chris Dark's collection. 


NB:
I've had a number of questions about my Friday Followers Gallery.  There are only two conditions for entry.

1: In this blog I only illustrate cards using die cutting or embossing techniques,  this is the same for the FFG.
2: You must be a follower of the Cupboard. 

If you have a card that you would like to share with fellow cuttlers, please leave me a comment and a link and I will get back to you.  It's that easy. 

Thursday 15 April 2010

Tippy Thursday

Ribbon is on my mind this morning because Brenda made a comment on her WOYWW post about ironing out creases and fold marks.  I have done this myself in the past, but these days (since my new hairstyle) I use my straighteners.  You don't burn your fingers, you just pull the ribbon through, and they get hot much quicker than an iron.   Another bonus (for me) is it doesn't remind me there is a pile of other things that need ironing so no guilt pangs!

Sorry I caused such intrigue yesterday with my covered up project - it's now nearly finished and I will let you see it in time - promise - no matter what the outcome!  BUT, for now it has to remain a secret....but I think the Cuttlers amongst you will like it.....and see other possibilities in your dies.  NB: Eileen - enough said, get on with sorting your papers and things. 

Back soon, anyone interested in going into the Friday Followers Gallery?  I'd love to hear from you.

Wednesday 14 April 2010

WOYWW

Good morning WOYWW'ers - hope you are all well and enjoying doing whatever you are doing.  Me, I'm trying to organize myself before I get completely out of control!  I can't say it's a pleasure because I'm facing up to tasks that have been left lying/lurking about for ages, but I think that finishing them will bring a feeling of positivity and perhaps even a smugness!

To start I've moved over to the other side of my room

I have lots of bits of paper and bills to pay and make decisions on, boring but....MUST DO.  My printer is also collecting papers that need copying/saving whatever, I can even see  2 discs and I have'nt a clue what's on them!  On the bright side I have a empty cupboard! 


Now to my desk.....
On the left another pile of allsorts for sorting.....on the right my sketch pad for ideas just in case one pops into my head (some hope whilst I'm paying bills).....I'm resisting the temptation to put the lot into the empty cupboard!  The rest of my desk is hiding under the red cloth - it's my little secret  because I'm in the middle to a  project that is literally under wraps. Will show you soon - it's on my list along with some really interesting stuff like defrosting the freezer, washing, ironing.....etc. 

Have a good day, hope to catch up with you later.

Tuesday 13 April 2010

Thoughts on Tuesday

I hear myself say  "I'm soooo busy!"  But, in truth am I????  I feel that sometimes I spend too much time thinking, rather than doing!  Looking here, opening this file, opening another, looking there....THIS has to stop, because now that the bowling season has arrived, along with the sun, and the garden jobs, I actually am busy!  Sound familiar? 

The question is how do you stop wasting time and get all the jobs done?

I decided to look again at my little book of calm - and would you believe it - here's the answer.....

"Get workload into perspective.  Your perception of workload usually relates to the amount of time you have at your disposal rather than the amount of work you have to do. Plan your time and your workload will take care of itself."

PLAN....now I know.....can I do?   Well it's worth a try - so I'm going to get out my "To do list" again - seeing things in writing, doing them, and CROSSING them off will hopefully make life less busy and more enjoyable and guilt free when I craft!

Bye for now - I have a list to write.

Monday 12 April 2010

Cuttlebug Border Folders

My tutorial this morning is based on a freebie from a friend...


I just love this image but, sorry before anyone asks, I forgotten the maker! 

When I get something new, I'm like a child....I want to play....colouring the image was not a problem, nor chosing the background paper (for a change), it was how to maintain my resolve that this blog would always show or use some aspect of the Cuttlebug, die-cutting and embossing????  I'd no embossing folder that was suitable or that reflected the flower pattern on the image.  The image did not lend itself to any die shape, but after searching through my folders I came across these....

border folders.  I wonder how many of you like me have put them at the back of the cupboard?  Did you use them once, trice or never?
So, here's my  image coloured with Promarkers and DI's mounted on card coloured with DI's and embossed with the border. I have never used border folders this way, and also this gives me the opportunity to point any new Cuttlers that are having difficulties with the folders making lines, to a tutorial I did on this subject last year and which may have got shoved to the back of the cupboard like my folders!
To finish my card I stamped a swirl pattern on the already swirly paper - add a ribbon - and a few flowers...
 and here it is completed!

Thanks for dropping by, hope your day goes well and that you find something useful in the Cupboard.