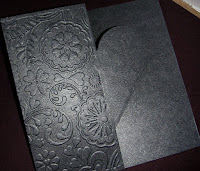
I'm going to try to show you how I made it, if it's not clear - SHOUT!
You will need:
Cardstock 11" x 5.l/2"
Nestabilitie Heart Die
Cuttlebug folder - Fantasy Flowers
Patterned papers, wire, beads
Fold cardstock and crease centre fold. On the card front - measure in from the centre fold 2.3/4" Top and Bottom and draw a pencil line.
Centre the heart die to this line and tape in position
To cut the shape I found that it was best to only sandwich the part to be cut inside the plates. Feed the flap through first, this will stop the plates banging down and marking the card.
Your card will be like this. You can now score down the pencil mark to the exact centre point on the heart so it will fold back.
Embossing a pattern on the front flap. Place the folder up to the pencil line and run through the Bug.
This is the your base card
I decorated my valentine card with a smaller heart die, embossed with the same folder, and then added wire and beads.
The inside of the card was decorated with more hearts and bows. The centre heart was a pop up.
The pop up was made from cutting three hearts and fixing them together - to show you how versatile this pop-up is I have made a butterfly shape
It doesn't matter which way you fold the shapes. I left the white underneath for a message - perhaps a secret one in the case of the Valentine! To complete my butterfly - wire and beads.
This technique could be used with numerous dies and I think will prove useful. If you create a card using this idea please let me know and link back.
To Stamptacular Sunday Challenge a big thank you for picking my card as the winner. I'm real chuffed!


.JPG)


5 comments:
Brill Eileen, and a well deserved winner!
The instructions are fab... as ever!
Chrissie
Must must must try this! It's just gorgeous!
TFS
Helen
Firenze Cards
Thanks for the tutorial Ikki! Here's my version...
http://firenzecards.blogspot.com/2010/02/cuttlebugged-valentine.html
Cuttlebug Hugs
Helen
Firenze Cards
Hi Ikki - have also credited you on my FB page - http://www.facebook.com/photo.php?pid=11237786&l=a74e6fbf32&id=631455053 - thanks for the inspiration!
Helen
Firenze Cards
Since I am a visual and a hearing learner I am not sure I got this technique correct. Anyhoo, I like the way my card turned out. Thanks for inspiring me.
Happy Easter
I used your technique as another challenge for my Cuttlebug-ers group at PaperCraftPlanet.
Post a Comment