Hi

Hi, Thanks for dropping by.

My name is Eileen but to friends in the card making world I'm known as 'ikki'. (which is pronounced I-KEY) From where or how this came about I'm not sure - it just got shorten from my original craft name of Ikemo by various friends along my crafting way! I started crafting whilst recouperating from an accident, and from my first attempts with peeloffs and paint - I was hooked! Now my passion is my BUG! and now BEADING!

In the Cupboard you will find ideas, news, tips and techniques to help you get more from this fab little machine. So come in - join the fun and Cuttle with me!


Monday 31 August 2009

Cuttlebug - Baby Birth Cards

Hi Everyone, I have just returned from visiting my daughter and 2 granddaughters who live in Scotland and instead of coming back to blogging refreshed and ready to go...the opposite has happened. My head is in a 'no go' mode! Think I enjoyed myself too much, and ate too much, and played too much, and then there was the drink or two to celebrate Claire's birthday.

I have managed to make two cards for my friend's daughter, who has just given birth to the most beautiful little boy called Tommy.

On White Linen Cardstock, I have embossed with the Baby Folder and added three lines with my score board to make this base card.


Using the folder this way I've created a border on which to added little Tommy's name.


I next added a stamped image, ribbon, letters and corners from the Vintage set, and, of course, inked the edges in Baby Blue.


and this is my finished card.

A simple card, but I think quite cute.


Couldn't leave the Grandparents out, so another CB card using the Swiss Dots folder and a PB stamp.


I have just found out that at Stamping for the weekend the challenge is for a baby card, so I going to enter these cards (can you enter two?). Not sure which I like best...another decision!?!? Hope you have a great crafting week. Now I'm off the seek my mojo! If you should find it, please send it back asap!

Thursday 20 August 2009

Tippy Thursday #14

Hi, over the last couple of weeks gummed up scissors have been a subject in Tippy Thursday. I have been amazed at so many ways you can clean them, and the tips keep coming.

From Barb - Baby oil works and has a pleasant aroma as well.

and Clare D is in a chemical free zone, so here's her tip: "Use the magic Eraser! Just get it wet and scrub your scissors. It is also how I clean my Cricut spatula and I feel safer."
Thanks ladies. I wonder if there will be any more tips about this?

Today I thought I would share with you my lazy (easy) way of stamping. I'm quite a novice at this and find that after die cutting a small label, I have the problem of stamping in the middle of it. To save my frustration at getting sentiments squiffy, I found this was the way for me.

Chose your shape and draw round the outer edge in pencil.
Then you can see where you are stamping.
Then place your die inside the pencil line and cut. And, it's in the middle!

I realise that this is a bit basic for you experienced and confident stampers, but this may help others like myself who suffer with a shaking hand when stamping. And, that's before I have a drink!

This also helps if you have a number of small stamps you want to use to compose a picture.


Happy Cuttling,

Thursday 13 August 2009

Tippy Thursday

Following my tip on gummed up scissors, I received the following from fellow crafters.

Chrissie - A wipe with Sansodor works well - and would you believe it I have a bottle of this sitting looking at me on my desk!

Sylvie - Betterware sticky stuff remover also works, and thanks for the invite to catch the sun, unfortunately you forgot to leave your address for me to visit (lol).

Samantha and Louise from DC tell me that if you're a clean up after use crafter, (obviously I'm not or there would be no gummed up scissors in my pot) alcohol free baby wipes do this and also many more things. Probably ungum my fingers too!

Thanks ladies for your tips - that's what my tippy Thursday is all about.

Now the for inside of my "Wibbly Wobby" Card.

I have used:
Red and Black pieces of card
Fiskar punch - Treading Water
Nestabilitie - Large Classic Circle
Embossing Pen
Stamps.
The small stamps are from See-D's - Boys Toys set
Cut out the large circle, emboss edges with pen and stamp

Punch border on the Red and Black card - (saving the red circles bits from the red card), and stamp

Attach red border


Position double sided tape on the back of the black card across the holes.
Don't remove the backing.
Turn over and press the red circle bits into the holes.
Now remove the tape and attach to the corner and trim.
Hey Presto - your corner.


The finished inside of my card - the football theme continued!

I love using up bits and pieces of scrap and when using plain card borders, adding these small throw aways creates a great effect.

Hope you like this and thank you all your comments and visits - My Wibbly Wobby creation was an undoubted favourite with you. Back on Monday with ????? I have my thinking cap on ?????? think I have an idea coming....

Monday 10 August 2009

Nestabilities - Wibbly Wobbly Card

I'm calling this week's card a "wibbly wobbly" one - the name just suits the type of card and effect you get. This is a very easy card to make, but the result nevertheless looks good.

Materials needed:
8" x 4" Black cardstock - centre scored
3.3/4" Square of red card embossed with
Cuttlebug Happy Birthday folder
2 Nestie circles
2 Nestie squares
Stamps and a coil of thin wire

After stamping the images on the circles - next secure the wire
to the back of back circle and glue the two circles together.


The wire is then attached to the back of the embossed square - not very tidy, but the front looks okay.

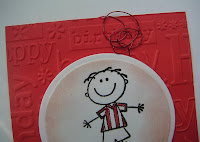


Your embellishment can now be mounted on the base cardstock.

You could leave your card like this, but I promised last week to show you how to get a different use out of your Nestie Squares which will add to the overall effect and is well worth the effort.

I have used them to make photo corners. I have been looking for a punch to do this, but couldn't track one down. So....I improvised.....

Using a magnetic mat, position two squares as shown and cut.


After cutting, remove the inner square and keeping the card
inside the outer, with an embossing pen emboss run round the edge.


This is the the effect you get and you then only need to cut across the corner. Your photo corner!

The best of this is that you can do different thickness of corners by using
different sizes of squares and you could also vary the length. Something
that you cannot do with a punch! Thinking about it now....you could place
more than two squares on the magnetic mat and make lots...and the middle is not wasted...you can always use this as a mat!


My finished "wibbly wobby" card.


I have decorated the inside of the card, but time restraints mean I will have to show you this on Tippy Thursday's post. I can tell you, however, that I was really chuffed with the result. This time I did use a punch, with a twist!?!?!?

Hope you'll have time to drop by.

Thursday 6 August 2009

Tippy Thursday

Hi everyone it's Tippy Thursday again, but first can I welcome all newcomers to my blog and also to say a big thank you to my regular visitors for your support over the last 6 months. Tutorials take time with the planning and without your encouragement I would find it difficult to continue. So please drop by as often as you like - if you are new to my site you will find a section called "Labels" on the side bar which will help you to find past tutorials. If you have any problems, or requests - please contact me - I'm always pleased to hear from fellow crafters.

Following last week's post - I received this new information on obtaining colour recipes from Mandy G over on the DC Forum.

"In case anyone wants any obscure colour 'codes' if you go into the wikipedia website and use the colour as a search phrase it comes up with the recipe. It even works for colours like teal."

Thanks Mandy, information like this is always useful to know.

This week my Pop-up card was mentioned on Card of the week. This is an interesting and informative blog which is well worth a visit. So when you're next blog hopping - hop on over there! To the visitors from that site, can I say "hope you enjoyed looking in my Cupboard and that you will come back again, and again, and again....."

My tip of the week - Scissors
No matter how many cutting blades, dies or punches we have, scissors are always a necessity in our crafting, but gosh they do get stuck up with our tape and foam pads. The other week I had three pairs ready for the bin, but like all the crafters I know, I kept kept give them a reprieve - I don't know why because they were all completely unuseable with the blades gummed up! Even if Superman was around I'm sure he wouldn't have been able to open them!

Then, a lady on C&C mentioned this magic unstickable word "WD40". I have tried all kinds of products to shift glue and nothing has work, but this does. Wipe over the blades, leave for a few minutes, and your scissors are ready to start cutting again. Try it..put new life back into those old and often your favourite scissors. Or, you could try emailing Superman!

Drop by on Monday I have a super card to show you and a new tip for getting more use out of your Square dies?!?!?!