Hi

Hi, Thanks for dropping by.

My name is Eileen but to friends in the card making world I'm known as 'ikki'. (which is pronounced I-KEY) From where or how this came about I'm not sure - it just got shorten from my original craft name of Ikemo by various friends along my crafting way! I started crafting whilst recouperating from an accident, and from my first attempts with peeloffs and paint - I was hooked! Now my passion is my BUG! and now BEADING!

In the Cupboard you will find ideas, news, tips and techniques to help you get more from this fab little machine. So come in - join the fun and Cuttle with me!


Thursday 26 March 2009

Cuttlebug Challenge #24

Make a cupcake - difficult one this. And, like my baking sometime does, this one did not turn out perfecto....still....if you haven't got the right ingredients....and start improvising...and I did....anything can happen. I lost this, and then I lost that, then the glue wouldn't stick, then the card wouldn't open becaused of the cherry, then I put my finger into the glossy accents on the cherry because I was impatient, the list went on, but I won't bore you any more. Here is my little cupcake, faults and all. Megan's only 3 and loves the icing on cupcakes so I'll be sending a eatable cake as well.
Folders for cupcake: Distressed stripes and Divine Swirls


Wednesday 25 March 2009

Great Cuttlebug News

There is great news today regarding the Cuttlebug which it has been rumoured will be going out of production.

This new was posted on the Cuttlebug Challenge Blog today.

"Is it true Cuttlebug and the folders and dies are going to be discontinued?

Provo Craft is aware of the strong following of Cuttlebug enthusiasts and supporters. As a result of this the only changes to expect in the future for this wonderful product are changes that would like to be seen by users such as yourselves. Provo Craft looks forward to continuing to bring the best Cuttlebug product we can so everyone can continue to make wonderful projects for years to come."

To read the full article pop over to CC now

Tuesday 24 March 2009

Partial Cuttlebug Embossing - Part 2

Well, I'm overwhelmed at the response to my partial embossing technique and would like to thank you all for your support and encourangement. I also apologize for being late with this posting owing to being unwell yesterday, hopefully with only jet lag!

So on we go with the second part of this tutorial.......


You will need
6x4 card
Stylized folder
The larger MFP (modifying folder pad)- see Part 1)


Place card in folder with MFP over the pattern and emboss as before


Your finished embossed card will look like this- If you want to see how I finished my card - pop over to ikki's corner - link on the side bar.
Having completed the embossing process of the 6 x 4 card, I going to take this idea on further and use the technique on a square card.


I used a 5.1/2 square card. Place the folder at the edge of your open card with the MFP positioned over the folder pattern and emboss . Keep hold of the MFP until the roller engages.


Now with the card open - place the folder towards the middle of the card lining up the pattern to the edge of the previous embossing. Unfortunately, although this piccy shows the folder in the right position - the folder SHOULD BE UPSIDE DOWN - CUTTLEBUG LOGO AT THE BOTTOM - (as we have done before) so you get the right pattern in the right place! It's that jet lag again (that's my excuse anyway).

Place the small portion MFP over the folder pattern and emboss as usual, taking care to hold the MFP in place until it engages the roller.


Unfortunately, as you will see there is a small area where the pattern does not work out, but ... you can touch this up with a ball embossing pen.


To finished the card, I have lightly chalked the pattern so you can see it more clearly and added a simple nestie flower to cover the little inperfection.....what inperfection!!?? I also added a few gems - don't know why because they were not necessary and I don't like them, but I do like the scored lines - they finish the card off nicely.


You now have four patterns that you can create from the one folder - not bad for 4 quid($6)

I love a bargain!

Hope you enjoy this project, as always your views will be of great interest to me and I look forward to hearing from you all.

Happy Cuttling, I'll be back next week with something new - TFL and come back soon.

Saturday 21 March 2009

Partial cuttlebug embossing with my modifying folder pad

Cuttlebug folders are great, but sometimes limiting - so to do something different ... how about trying this


You will need

Cardstock to make a 6 x 4 card
Pieces of card and paper
Stylized Flower Folder
Glue and your bug


Start by taking a piece of spare card or paper to fit folder and emboss as usual. Then cut into two peices - carefully following between the outlines of the pattern.


You now have two patterns.

I have made both thicker by glueing together several pieces of card to the same thickness as the B Plate, because this will be used instead of your second B plate.
You have now made a MODIFYING FOLDER PAD - which I shall call MFP.
Caution - never force through the machine, best to start thin and work up. (You could always use a extra shim if your MFP is not thick enough).


Today I will work with the smaller MFP, but don't throw away the other because you will need it for the second part of this project.

Place your card into the folder to the centre scored line. NB: I have used the folder upside down - see the Cuttlebug logo and the card is not wrapped round the folder.


Place your MFP over the pattern to be embossed.


The sandwich would be: A-B-folder and card - MFP.


Carefully run through the bug


You will have made this


You could stop here because this would make a simple, but elegant card for that difficult occasion when you want to send a message but are not sure what to make or say.


I have taken it further by re-inserting the card into the folder in a different way.


Again place your MFP in line with the pattern and emboss again.


So from the folder and MFP


You now have an embossed card

I have finished the card with a few gems, butterflies and a scalloped oval nestie tag - and it's different!


If you like this card, I hope you will join me on Monday when I will show you how to use the remaining piece of the pattern.


Thanks for dropping by - please let me know what you think of this idea and if it works for you.


I'm so pleased to be back

Hi everyone, hope you are all well and I look forward to catching up with all your crafting asap. I will be posting a new project for you tomorrow (might even be later today if I don't start unpacking and doing the washing! lol)
Hope you'll have time to drop by.

Awards


I returned from holiday and found this lovely award from Kay.
I was also given this award by Chrissie

I want to thank you both for your kindness - I really do appreciate your support.
I'm going to pass both these awards to all my Docraft friends, where would I be without your help and encouragement.


Monday 16 March 2009

Cuttlebug News

Hi there, guess what - I'm still on holiday, but as promised I want to show you a preview of my next week's tutorial. My friends on Docraft have been waiting for some time to see how I acheived this. So friends, you won't have much longer to wait!

Last week I asked you to tell me what my new flower was made from.
Did you guess right? It was made from this - yes, a tea light candle holder!

and a green candle at that! Just how green can you get!

Take a look at the die shown last week -the reason it worked was because the petal centres did not cut through the metal at the middle of the die as they would on card. I did this for an experiment - You do this at your own risk, because I don't know your machine and how much pressure there is on the roller. It seems all machines differ.

The only guide line can be - never force anything.


Next week I will be looking at making a similar card to this using the Stylized Flowers folder and die cuts


I hope you like it and will drop by to see just how I made this folder work for me.....

Monday 9 March 2009

Cuttlebug, Nestie Die Cuts and Adhesive

This week I'm only doing a short tutorial because I'm on holiday - so as you read this I (hopefully) will be lying in the sun.

The subject is Die Cuts and how you stick them to your projects. Obviously bigger is easier, but smaller is more difficult. I'm thinking of alphabets, swirls, and filagree and I'm sure there are others dies out there that I don't know about!

I have the Harmony alphabet and I like to link the letters as you will see in future projects. Sticking them down on embossed cardstock can be messy, so when I was given a tip by my Cuttlebug Buddy, Chrissie, I was more than pleased because it worked really well. Chrissie is a keen cuttler, and a very talented crafter producing some stunning cards. She works her bug well and creatively and you'll enjoy a visit to her blog.


This is Chrissie's tip:

Double-sided Sellotape. Well we all know this tape is invaluable for matting and laying but this an extra use. Chrissie tells me that you can buy 12 x 12 sheets of DST. I have a roll of 2" (this fits my offcuts from square cards) and works well. I've also seen self-adhesive pads DCWV do one.

To make this work - cover the underside of a small piece of card or paper with the DST, and place tape side down on the B plate with the die on top. I say this because I have cut so many letters the wrong way round, it's very easy to do!

After running through the bug, all you have to do is peel off the backing and stick on your project, with NO glue marks showing. I like this because I'm a bit heavy handed with the glue pot - I never seem to get the right amount and I hate to see marks on the card. This way you can a use a light weight paper to match your project, and you can also make your own stickers.

If anyone has any other tips on adhesives that they would like to share, please get in touch with me and I will pass them on linking you.

Now, I'd like to show you another flower - I used this die cut and
painted it with nail varnish. I don't know another crafter who doesn't look for ways of how to use bits and pieces before things go in the bin. I definitely fit this category and I even have my hubby on the lookout! so this flower has been made from a recycled object, BUT WHAT?

Answers on a postcard please - NO, ONLY JOKING, but you can leave a comment if you think you know what object and material I've made it from.

Have a good week, hope you'll drop by next week when I will be previewing a new project using the Cuttlebug Stylized Flowers Folder. Don't miss this it will open your eyes to using folders!

Wednesday 4 March 2009

A Circular Scalloped Nesties Card

Since my tutorial of a Circular Nestie card has been a so popular, I thought you might like to see a slightly different version, but still using the same technique. I just made my Penny Black image pop over the fold - and showed kitty balancing on a glitter ball.

If you like these shaped cards, you will find a different shape on my other blog which is called Ikki's Corner. You are very welcome to pop over there and your comments are always appreciated - I love hearing from you.

Monday 2 March 2009

Make a circular card with Scalloped Nesties

This week I'm making a circular card using the scalloped nesties. An interesting little card that can be used for any occasion.

You will need
Cardstock: 8 1/2" x 4 1/4"
3 Scalloped Nesties (Petite or Classic)
Ink, Ribbon and a stamp

Score and fold the cardstock in half.

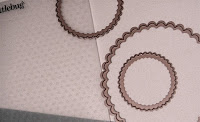
Position the largest Nestie as shown below.

Sandwich: A Plate: B Plate : cardstock: Nestie cutting edge down: C Plate
Run through the Cuttlebug


Your shaped card


Emboss the front of the card (your personal choice, I used the Swiss Dots folder) and inked the edges


Now cut 2 more circles of different sizes.


Emboss the largest


Stamp the smaller with your choice of stamp


Add a ribbon to the fold


When assembled you have your finished card


A little cutie! Hope you enjoy making this.
Well Cuttlers, that all for now, see you next week