Hi

Hi, Thanks for dropping by.

My name is Eileen but to friends in the card making world I'm known as 'ikki'. (which is pronounced I-KEY) From where or how this came about I'm not sure - it just got shorten from my original craft name of Ikemo by various friends along my crafting way! I started crafting whilst recouperating from an accident, and from my first attempts with peeloffs and paint - I was hooked! Now my passion is my BUG! and now BEADING!

In the Cupboard you will find ideas, news, tips and techniques to help you get more from this fab little machine. So come in - join the fun and Cuttle with me!


Showing posts with label Ribbon. Show all posts

Thursday, 24 June 2010

Tippy Thursday - Ribbon

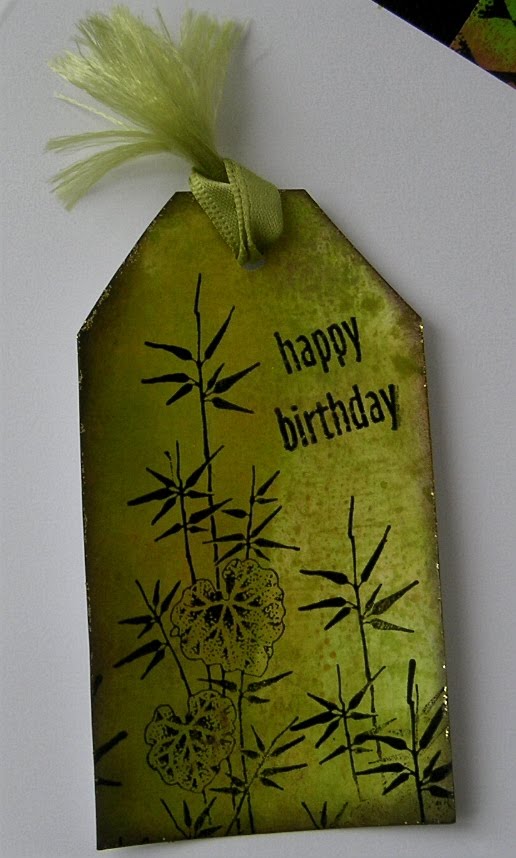
I have been asked how I made this kind of tassel for my tag...

It's a bit different and it's very easy......


Take a length of satin ribbon and cut off the binding edge on both sides, this will allow you to shred the warp threads from the weft.  Now you repeat the process on the other end and hey presto.....


         a fancy ribbon for the tag I made and didn't know what to do with it....actually I still don't, but at least the tag is finished now!

Monday, 21 June 2010

Spellbinders - Nestabilities - Labels One

My tutorial today is very different to my usual simple less is more style of card, and I hope you will like it.....

Materials used:
6 x 6 card
Nestie label 1
DP - Basic Grey
Various stamps and inks
Ribbon, wire, beads

I never realised I had a favourite crafting colour until I looked back on my recent cards and saw that Green in some shade or other was there!  Today is no exception.....
I have always loved papers from Basic Grey, this is from the Scrapbook Designer papers - just a green with blobs of peachy orange and black  lines.....perfect for stamping on!  The flower stamp is from Hero Arts called Flourish Bloom and the Dragonfly is by Stampendous and together with a Label One die and a few more dabs of distress inks, make a surprise when opening the card.

Using the same DP for the front of my card, I stamped the dragonfly and a border of swirls with Adirondack Raison and again added a bit more colour to the edges.   

Now I needed an embellishment...
I tried something new for me - a resist technique.  I first stamped the flower with a white acrylic dabber (the border is the same stamp).  When dry I completely covered the tag with various colours of DI's then rubbed  the ink off to show the pattern.  All I needed then was a touch of the raison colour by way of the dragonfly and a sentiment, a light misting of water and a few splodges of glitter glue (which you canot see - drat!) to finish  my tag.

I made a tassel from satin ribbon

a curl of wire and beads and.....
my card was finished. 

I enjoyed trying the resist technique and stamping on decorative paper.  It's taken me a long time to pluck up the courage to change some of my crafting habits, but now I've started, doubt I'll stop!


Thursday, 17 December 2009

Tippy Thursday - Ribbon

Be it wide; thin; plain; striped; polka dot; satin or whatever, ribbon plays a big part in our crafting. BUT, it can become a box of tangled mess!

So how to store? I have seen boxes and bags with holes round the sides, so that the ribbon can poke through and  be pulled out! But I think you  will still get tangles - am I wrong? Tell me please! Or if you have a better storage system, again I'd love to know and so would others!

For myself I have a very simple storage for ribbon, not perfect (I still get tangles at times) but it works reasonably well for me. Self sealing sandwich bags - cheap and cheerful (50 for £1 at tool box). You can see at a glance what you have without having to open the bag. I have a bag for each colourway and they sit in a row in a storage box. It works okay if you remember to re-seal the bag!

I know a lot of crafters have a Bow Folder, they do work and tie very neat bows, but as anyone made their own? I have set a task for my dear hubby, something to do during the cricket lunch break!!!  Hopefully, fingers crossed, I will have one to show you soon.....and some neat bows!

Talking of tangles reminds me that I heard a great tip on C&C from Sheena Douglas the other week.  If your ribbon has  kinks or  folds that need ironing, you don't need an iron if you have hair straighteners!  I have tried this and it's much quicker than getting the ironing board out and waiting for the iron to warm up.  Anyway when the boards up I have guilt pangs knowing I should really be sorting out the ironing basket not ironing ribbon! 

Another tip.  If you have a down ribbon and a cross ribbon and want to add a bow over the crossing ribbons - you can use invisible thread to  pull two ribbons together.  Knot the thread, make a bow and add over the knot.  Neat.

 Love to hear your ideas and tips on ribbon. 

Now I'm working on using magnetic mats - back very soon with my results and some pics.