Hi

Hi, Thanks for dropping by.

My name is Eileen but to friends in the card making world I'm known as 'ikki'. (which is pronounced I-KEY) From where or how this came about I'm not sure - it just got shorten from my original craft name of Ikemo by various friends along my crafting way! I started crafting whilst recouperating from an accident, and from my first attempts with peeloffs and paint - I was hooked! Now my passion is my BUG! and now BEADING!

In the Cupboard you will find ideas, news, tips and techniques to help you get more from this fab little machine. So come in - join the fun and Cuttle with me!


Showing posts with label Love and Marriage. Show all posts

Monday, 14 May 2012

Wedding Day

Hi, earlier this year I was commissioned to design Wedding Invitations and Friday was the big day, so out came my Nesties and my thinking head......


The colour palette coordinated with the wedding invites which made my project much easier as crafting and motivation is still a problem! AND, this new blogger layout is defo not helping! 

I have not been as idle as it would seem - I have also this week designed a new blog heading with Craft Artist - what do you think?


Friday, 10 February 2012

Nestabilitie Label 4 - Golden Wedding Anniversary

Today is my husband's cousin's Golden Wedding anniversary and this is the card  I've sent to them....


The stamps are from Chocolate Baroque called Floral Swirls and as well as using them to embellish the base card and label, I have also put them to good use on the insert.......


I think I'll have to add this card to my Love and Marriage showcase. I love the owls sitting together side by side -  very appropriate when celebrating 50 years of marriage!

Monday, 14 February 2011

Nestabilities Classic Hearts - to show you care

Hearts to the rescue for a quick valentine card.....just in case you forgot!!
Classic Heart smallest die cut several times from glossy red card, and embossed with the heart and dot folder from C2U   
PC generated sentiment and lines.


Sunday, 15 August 2010

Fold Back Card - with part shaped cut out

Well, I have lost C& C Spellbinders pick of the week - wonder where it went? 

If you saw the show, Sheena Douglas from Creative Expressions made a card with a fold back front with a part cut label 4 shape.  If you liked this card I have a tutorial here of a card that I made in February that will show you how to do it. 

Thanks for dropping by, hope you have found something of interest.


Monday, 12 July 2010

Cuttlebug - Embossed Gift Card

It seems the custom now-a-days is to give money as a wedding gift, but a cheque in an envelope is a bit boring and basic, so I thought make a gift card for the bride and groom. Cuttlebug folders are ideal for wedding and anniversary cards, I use them frequently - Swiss dots, D'vine Swirl and Texture being my favourites. Whether you are giving a cheque or a voucher, for whatever occasion, you might find this useful.

I used:
4" x 4" Cream Hammer card
4" x 2.1/2" Cream card for the pocket
2" x 2" Cream card for the embellishment
4" x 1" Pink card for the contrast on the pocket
CB Textile Texture folder
CB Wedding folder - Bride & Groom
Fiskar border punch - Sunburst
Round edge corner punch
Chalk, ribbon bow and gem


Emboss the front of the card with the Texture folder and round the corners. Chalk the edges - if you know the wedding colour scheme this is always a good choice.

Emboss the 4" x 2.1/2" piece of cream card matching the pattern to the front embossing - this is worth doing as you will see later.

Emboss the Bride and Groom on the 2" x 2" and round the corners - lightly chalk the edges. I added a heart gem in the same colour. Mount on card with foam pads.

For the pocket on the inside, first punch a border on the already embossed cream card and glue the pink strip under the punched pattern. This is where matching the pattern is important. Tape the sides and bottom, (you don't want to lose that cheque) and stick to card. Trim and round corners. This folder looks great embossed or debossed so you get a good look on the front, and inside front of the card, the D'vine Swirls folder also works well. I added a single page insert with a message.

My finished gift card - I think you will agree that it looks better than a plain envelope.
As I mentioned before, you could adapt this idea for any money or gift token gift card, it's very quick and easy to make, and Christmas is coming!!!!

Monday, 5 July 2010

Cuttlebug Textile Texture Folder - Wedding Card

Hi, the Cupboard is full of ideas and techniques and some get lost on the back shelves!  This card is one I made in August 09, and since it is an usual design I thought I would re-posting it for all the new visitors that drop by for a look in the cupboard.  Hope you like it!

I have made a number of wedding and anniversary cards lately, and have received queries on how I achieved the lines below my embossing. This I do with a score board - it is one of the most useful tools I have.

This is my most recent card that shows how effective lines can be.

I first printed the words on to a 6" x 6" card and then embossed the top half of the middle section with the Cuttlebug Textile Texture folder.

Then used the score board to emboss lines to frame to pattern.

Again using the score board, I added lines to the heart shape for interest. It's difficult to emboss die cut shapes and at the same time retain the embossed edge which I like, so this was an experiment which turned out well.
My finished card with a few bits and pieces added - actually the bouquet took longer to make than the card, but, I did enjoy doing it! AND, isn't that what crafting is all about!!
Thanks for dropping by, look forward to hearing from you.

Monday, 1 February 2010

Nestabilitie Pop-up card

This is the Pop up card that I made for the Stamptacular Sunday Challenge last week.

I'm going to try to show you how I made it, if it's not clear - SHOUT!

You will need:
Cardstock 11" x 5.l/2"
Nestabilitie Heart Die
Cuttlebug folder - Fantasy Flowers
Patterned papers, wire, beads

Fold cardstock and crease centre fold. On the card front - measure in from the centre fold 2.3/4" Top and Bottom and draw a pencil line.

Centre the heart die to this line and tape in position
To cut the shape I found that it was best to only sandwich the part to be cut inside the plates. Feed the flap through first, this will stop the plates banging down and marking the card.


Your card will be like this.  You can now score down the pencil mark to the exact centre point on the heart so it will fold back.

Embossing a pattern on the front flap.  Place the folder up to the pencil line and run through the Bug.

This is the your base card


I decorated my valentine card with a smaller heart die, embossed with the same folder, and then added wire and beads.

The inside of the card was decorated with more hearts and bows. The centre heart was a pop up.


The pop up was made from cutting three hearts  and fixing them together - to show you how versatile this pop-up is I have made a butterfly shape

It doesn't matter which way you fold the shapes.  I left the white underneath for a message - perhaps a secret one in the case of the Valentine! To complete my butterfly - wire and beads.

This technique could be used with numerous dies and I think will prove useful. If you create a card using this idea please let me know and link back. 

To Stamptacular Sunday Challenge a big thank you for picking my card as the winner. I'm real chuffed!

Tuesday, 29 December 2009

Cuttlebug - 2009 Top Tips - No 4

As we near the end of 2009 which has been a busy year for me, I thought I would look back at some of the postings in the Cupboard. I have done so many tutorials and postings that I was amazed and surprised at what I found hidden away and had forgotten about! This led me to think of what I considered to be my best tips of the year and for the next four days I will show you what I consider to be my top 4 Tips for using your Cuttlebug and dies. You may have seen these, but just in case not, I don't want you to miss them!

Today my Top No.4 tip has to be using my small dies to make charms for cards. These have proved to be really useful for displaying birthday ages and wedding anniversaries.  You will find more ideas for using these charms under the label: Love and Marriage.

From:  5th July 2009

The last week has been hectic for me but I still managed to make a couple of cards using my Cuttlebug.

At the risk of becoming boring, I have used my Butterfly Shapeabilities to make a completely different card to last week's, because I thought you might like to see just what you can do with the smallest die.


Using a mottled beige cardstock cut to make a 5.1/2" square card, stamp a large swirl in gold ink and embossed with a clear embossing powder. 2 Fancy Corner die cuts finished the base card. Don't throw away the pieces left over - these can be used to decorate inside corners.


For the embellishment I used a thick handmade patterned paper to
cut a large butterfly and embossed this with the Paisley Cuttlebug folder.


To increase the boldness of the butterfly, use a glue stick to add a thick layer of glue to the edges. Cover with gold embossing powder and melt the power and glue with a heat gun.


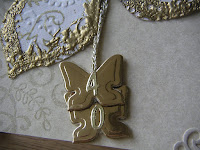
This is the effect you get.


To complete the butterfly's body use : 2 eyelets and some twisted gold thread. Gold wire and beads for the antennae.
Cut 4 small gold mirror card butterflies.


Attach back to back over the gold thread to make 2 charms on which I have added numbers for this special birthday card.


Still using the Butterfly theme, cut and emboss the larger die - ink the edges and stamp in some way and you have your inside card completed.

The finished card.


I'm sure you will like the charms that you can make
with these small dies. Here I have used the heart dies on this Diamond Anniversary card.
Simple but very effective embellishment!


Hope you'll have time to drop by tomorrow for Top Tip No3.

Saturday, 16 May 2009

My Nestie Hearts - so useful

Yet another wedding card - I'm so glad I bought these Nestie Hearts! They have been so useful this week and make the most perfect embellishment for any love theme project. I printed the words on pearlised card and then cut the hearts and embossed them. With a few flowers, feathers, beads and ribbon - done! The card by DCWV was a very classy pearlised stripe print in gold and off white. Just made for a wedding! I've really enjoyed my crafting this week, it's been a pleasure to work with lovely materials that make such simple yet elegant cards. I think this is the style that I like best! I must be a romatic at heart!


This week has been an amazing week and I would like to say a thank you to all of you that have visited my blog and made it so successful. I really do appreciate your support and hope that you have found something useful that will help you make more use out of our wonderful little green bug! I'll be back on Monday with something new.....

Saturday, 9 May 2009

Be Inspired Cuttlebug Challenge 30#


The month of May - it's time for Weddings! My Nestie heart dies are sure coming in handy!

The Cuttlebug Challenge this weeks was guess what - Yes, weddings and so.... I have made a card and boxed it. This is was a new venture for me, never made a box before - it's not perfect but does make the card look good and expensive!


Inside the card I used the heart dies and also for the embellishment. The initials are from the Harmony set - couldn't be more appropriate!