Hi

Hi, Thanks for dropping by.

My name is Eileen but to friends in the card making world I'm known as 'ikki'. (which is pronounced I-KEY) From where or how this came about I'm not sure - it just got shorten from my original craft name of Ikemo by various friends along my crafting way! I started crafting whilst recouperating from an accident, and from my first attempts with peeloffs and paint - I was hooked! Now my passion is my BUG! and now BEADING!

In the Cupboard you will find ideas, news, tips and techniques to help you get more from this fab little machine. So come in - join the fun and Cuttle with me!


Friday, 29 April 2011

Grand Calibur A4 Die Cutting Machine

If you are interested in the Grand Calibur A4 machine there is an independant report on this link that makes interesting reading.

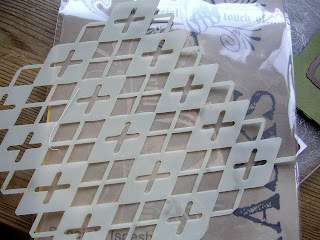
The sandwich for using the  "special touch mica mask" from Creative Expressions  is

Grand Calibur:  Base plate/ mask / card / Rubber mat / Embossing plate

Joy: A/ black mat / card / mask / black embossing plate


Thursday, 28 April 2011

Tippy Thursday

Well the weather men were wrong again today - the sun is shining this morning and the sky is blue, lets hope they are tomorrow.

I have received a number of questions and suggestions: 

The leaf on my LIM card was cut with a Marianne Die from a very heavyweight gold mirri.  I did have to run through the Bug twice, it gave a clean cut  and the shape came out easily.  The light blue metal that they are now using leaves no marks on the cut as did some of the dies in the dark blue metal.

I was asked about one of my Wedding &  Love cards on how I had embossed the top and bottom of the card without lines. This was done simply by topping and tailing a folder.  You can only do this on folders that do not have a definite up and down pattern, and you feed the sandwich through in the same way as on my tutorial on embossing masks as this avoids lines.  If you do get a line - there's always a scoreline! Since the Cupboard has now been joined by many new Cuttlers, I think perhaps I should dig out some of the basic info on embossing - it's surprising how you forget how you achieved a certain look!    Can I also say here that if you want me to reply direct - I need a contact addy or your profile needs to be available so I can find your blog.  If you need help on this, please contact me. 
On my TT post last week re scraps of card, Paula (PEP) left me this comment which I thought was a good idea:  "Love the idea of the tag. I keep all my card pieces cut from larger "new" sheets in one drawer, separated according according to colour in plastic A6 boxes. I'm quite good at looking in there before taking a new sheet but often don't have quite the right colour! Am thinking of streamlining card & paper so I use only one brand/supplier. Also I punch all my little bits so I have stacks of small boxes of punched flowers, butterflies, leaves, hearts in a discarded CD rotating CD tower. The idea is that once a project is finished I punch all the cardstock bits - but sometimes I've got a few deadlines close to the pile to punch is overflowing."  Thanks Paula, and don't forget you can also colour our B&P with inks!

Also pleased that it gave Pat Gavin the incentive to sort out her bits and pieces into "baggies". Well done Pat, hope it works for you - the secret is to keep on top of the B&P's is by filing them away when you have finished a project.  (tongue in cheek here!)

Thank you all for your comments and suggestions, if anyone has come up with a good idea, or a card they would like to share with us - there's always my Fridays Followers Gallery. 

Wednesday, 27 April 2011

Embossing with a Special Touch Mica Mask

Today I'm going to show you how to use a Special Touch Mask from Creative Expressions.

The sandwich for embossing this type of mask is:  A / tan mat / card right side up / mask / 2 B plates and possible shim/s depending on your machine

You place the mask on the front edge of the card

and feed the uncovered part through the Bug first.
 The reason for this is that you will avoid the drop from the mask to the card that can give you a nasty line!
(This is also the way to use folders when emboss straight onto card.)

now score your centre fold for an A6 card

you will see that the pattern is continued over to the back of the card - using lines A5 and DL on the board - score 2 further lines.

when folded your card will look like this, which I think is a professional finish to the embossed front.

The embellishment is another from my bits and pieces box that I coloured with Promarkers and then triple embossed.   
The name of the stamp is Floral Spray from Elusive Images -
The Mask is called Blossom - you can buy these from Liz at make a lasting impression for £3.91 including postage.  
I do favour simple and clean cards, but these masks can be used to add colour.
You can spray with glimmer mists, ink over the mask with distress inks, paint or chalks, even embossing pastes and the stencil washes clean is a mild soapy water.   
Thanks for dropping by - have a good day whatever you are doing!


Tuesday, 26 April 2011

A tag with a difference!

The challenge over on LIM is "off centre" and I have stuck with  using up a few bits and pieces and made this.....

the front of my tag (which is actually the back of a previous stamping that I was not happy with)....
to the back I added a piece of red card, stamped with a verse and leaf from EI Tall Trees
then laminated (could this is classed as a form of acetate?)  Sorry I missed this LIM.
Why did I do this? Well, it's Dave's birthday on Saturday and he's an avid reader and I thought the tag would make a lovely bookmark that could be used long after the occasion.

I used a repositionable tape to fasten the tag to a red mount so when he says "Do you want this back for your bits and pieces pile" - I can say "NO" and produce the bookmark!


The leaf is a Marianne Creatable die, and the stamps are a various collection. 

Monday, 25 April 2011

Tags from bits and pieces

Easter Monday and the sun is shining, but I managed to find a bit of time to craft, but I should be in the garden!
I returned today to my bits and pieces bags to show you how to make a double tag with your Nesties....

I chose two of my Mega Nesties and cut as you would with a sandwich of A/B/card/die/C

To give the base tag some texture I used one of the masks from Creative Expressions.
I like these - they emboss well in the Bug and the JT and more and more designs are becoming available.
They are a 6" x 6" size and I find them even more useful that the Cuttlebug Folders because you can not only emboss a larger area, but you can emboss your Nesties with them!
This is how.....

Sandwich:  A / Tan mat / die cut side down with cut in place
   
select the area you want to emboss on your cut  and cover with 2 B's and a shim(s) and you have....

an embossed tag and also a clean embossed edge in one go!   I think you will like this too!!

I  used a MS corner punch for even more detail and all was going well with my smaller die until...
I punched a hole in the wrong corner - Drat, and then time ran out but I thought I show you anyway and make you smile - well it is Easter Monday and the sun is shining so why not?


Thursday, 21 April 2011

Tippy Thursday - bits and pieces

Hi folks, like many crafters I do not like to throw things away but the other day I looked around me and thought "YOU REALLY MUST DO SOMETHING WITH ALL THESE BITS AND PIECES" but the question is WHAT?????

For a start this is what sits by my desk.....

it's where I store cut offs of paper and card - I'm sure you have some too!

colour coded (well most of the time) in plastic wallets

 One way to use these leftovers is to make tags, and since I have some new stamps from Inkylicious and also a Martha Stewart corner and border punch this seemed a  good way to start.....

I felt really pleased and proud of myself when I had finished my project - I had used two bits of waste, 2 new tools and stamps, and some raffia that had tied up a bunch of lovely red roses from my crafting mate Chrissie of LIM fame, and enjoyed myself!  No wonder I love crafting!!  I have my thinking cap on for more ideas on using more of my leftover stash because I have lots (and I mean lots)!

If you have any suggestions - please tell!

Wednesday, 20 April 2011

Chocolate Baroque - Teeny weeny Meadow

Gosh how quickly the time goes when you're busy crafting....I have just finished this months DT samples, and found a minute to drop by my own blog! 

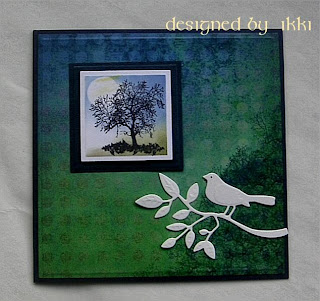
This card is from my DT samples from January   - I know a lot of crafters have purchased these mini stamps and I'm sure you will find them very useful and so interesting to work with.


The decorative paper is from the CB (EI)Simple Elegance range, over stamped with the same tree as the focal image. I used a circle to mask off for the moon, colour with distress inks and stamped the image in black.  The bird is a Marianne Creatable die call Bird on a Branch - very original name!

ikki

Tuesday, 19 April 2011

Chocolate Baroque Doodle Bird

Hi, I'm home again but unfortunately too busy to do any crafting other than I DT work, so since I messed bu the picture in a post last week,  I have put it right today.

I have been collecting Alcohol Inks for sometime, but realised that I never use them, so I had a play when making one of my DT cards.....

I used  glossy card and three colours of ink and just moved them about.  It's very interesting because you never know what the result will be!
Then I stamped the bird with Stazon on and embossed with a clear embossing powder.
The acrylic tag was coloured in the same way.
The flower is a Crealie, and the leaves are part of the bird on a branch (minus bird) from Marianne Creatables. I also embossed the panel with a mask from Creative Expressions - Ivy.

Quite a busy and colourful card for me - obviously I felt in a purple mood!

Saturday, 16 April 2011

Chocolate Baroque - Mini Script and teeny weeny

Another of my DT pieces.....
 the colour combo of black and red turn a simple card into a stylish dramatic card!

The stamps are from the Mini Script (a love definition) and Teeny Weeny Stamp sets.  I stamped the rose twice, cut out one then used a masking technque to stamp the script behind.  The sentiment is from the Birthday Greeting stamp plate.

Friday, 15 April 2011

Hi - update on my last post

Hi, I'm on holiday at the moment and I'm sorry that you can't see the picture on my last post.  I don't have the means to put it right at the moment but I will when I get home. 

I have another DT card to show you tomorrow - fingers crossed I have pressed the right buttons!

Thank you all for your lovely encouraging comments on my posts this week, so pleased you like the new stamps from CB - I'm very priviledged to have the chance to design with them.

Monday, 11 April 2011

Nestabilities Pendant and Border dies - Chocolate Baroque Doodle Stamps

Monday does seem to come round quicklythese days!  Today for my tutorial I thought I would show you another of my DT cards, this time using one of the new Doodle stamps......
Materials used:
A4 sage green card, extra sage green, dark green and white card, decorative paper
Nestabilies Pendant and Border die: Spades
Nestabilies: Classic Squares, and Oval
CB: Doodle Rose
Creative Expression Mask : Ivy
Distress inks, Marvy la Plume pens, ribbon

Method:  Centre score and fold A4  sage green card.
With large square die emboss onto the card using the sandwich I gave you a couple of weeks ago.  - you will the recipe on my embossing page.   Or you could use a magnetic mat - you will find info and examples on how to do this in the label section on my sidebar under Magnetic mats.
Cut the second smaller coloured square and emboss with a mask or folder.
Cut and emboss the Pendant die from decorative paper.
Cut and emboss the border from the same card as the base card. (I left the cutouts in place and secured with tape).
Cut an oval from white card - colour the stamp with Marvy la Plume pens and then stamp - emboss with the mask and colour with DI's.
Assemble, threading the ribbon through the pendant and fix on the back of the square.

Hope you're still with me this take some explaining!   And,  that you are tempted to try the embossing - yet another way of using your dies -  and all your dies can be used this way!  It may sound difficult but it's really easy - trust me I'm a Cuttlebug crafter (lol).

Saturday, 9 April 2011

Chocolate Baroque Teeny Weeny Meadow and Nestabilities - Mega Rectangles

I have another of my DT cards to show you today from the recently released Teeny Weeny Meadow stamp plate.  When I received my DT package from Glenda way back in January, I found so much I could do with them and also how well they combined with the Artylicious CD Esssence of Nature. 

Materials used:  6" x 6" card, blue & white cardstock
CB Stamps: Teeny Weeny Meadow (UA6GW0349)
EI Stamp: Sentiment - Essence of Nature (UA4SP0339)
Arytlicious CD Essence of Nature
Nestabilies: Grand Squares, Mega Rectangles
Distress inks, ribbon, dragonfly charm

  By cutting two or three of the mega rectangles it is possible to make a book embellishment. 
To make the pages curl - score 2 slightly apart lines down the centre of the cut, and fold  inwards, then  use an embossing stylus or similar to curl the edges backwards.  Use a ribbon to cover the centre lines in the manner of a bookmark.    The mini stamps were ideal for printing on the pages.
I was pleased with this effect and although unusual, I loved my blue trees!

Thursday, 7 April 2011

Tippy Thursday - Marianne Creatables

Hi, bit of a change in the weather today, but my spirits were lifted when the postie dropped my order from Make a Lasting Impression on the mat.  Boy was I pleased with the contents, getting new crafting goodies is something I LIKE!

I was so pleased that the ironing went out of my mind, I needed to see what these beauties would do.....


These dies are from Marianne Creatables - and I think they are going to give the die cutting manufacturers some competition!

They have changed the colour of the die, which did seem to be giving some crafters a problem with transferring the dark blue colour to the cut, and instead have gone with this lighter blue.  No colour transfer here!  The designs are interesting, - the leaf and the hearts cut and emboss really well, and they have thought about making the cuts easier to release and have successed with the additon of small holes positioned round the dies.  The leaf which is a delicate cut came straight out of the die first time.  At a cost  of £7.90 including postage - not unreasonable.  
 
Talking of cutting, a few crafters have been having problems with the Bug cutting and embossing.  I think that the main problem for this is not the Bug but the plates.  Repetative cutting, especially if you always place the die in the middle to the plate, will make the plate thinner and so reduce or give a uneven pressure on the sandwich.  You will also find with well cut plates the the cut is not always clean (ie the edges are rough), and the cut marks on the plate will also make marks on the underside of the cut.  If you don't want to buy new plates, you could try moving the die to the side and rotating the cut 90 degrees after the first run and doing it again.  The under marks can be eliminated by placing a piece of copy paper on top of the plate.  I have an old and new set of B's, I use only 3 of the 4 - 2 old very marked one and l of the new ones (I'm saving the other new one for a rainy day).  If I try cutting intricate dies with 2 old sometimes they wont cut, if I use 1 old and 1 new - it works.  Why don't I throw the old ones away - well I'm a crafter and the two old ones work with embossing and still have some life in them!   

After telling you about the Marianne dies, I will also add that some of the new Nesties are on sale at Liz's. Now before you tell me I'm a temptress, you can look out of interest, but you don't have to ?????? 

Wednesday, 6 April 2011

Chocolate Baroque - Doodle Bird Stamps No. UA5SP0346

My friends and I  had great fun using the new Doodle Bird and Butterfly stamps from Chocolate Baroque and over the next week you will be able to see more of our work on our indiviidual blogs and also on the CBDT Blog.   This is one of my pretty cards!  


Materials used:
6" x 6" White Card, White and Lilac Pearl card
Decorative Paper: Simple Elegance
Flower die: Crealies - Swirls: Marianne Creatables
Nestabilities - Classic and Grand square dies
Chocolate Baroque: UA5SP0346
Grundgeboard squares coloured with alcohol inks edged with embossing powder
Ribbon and pearl gem.


Monday, 4 April 2011

Less is More and St Lukes Hospice Challenge

Another interesting challenge from LIM - A touch of RED......

The embossed lines were done with my Eazi Score board.

The dies are Nesties - I have both the large and small sets and although it lovely to have lots of shaped dies, it is so useful to have a full set of basic shapes for matting and layering.  I know you can make faux mats and if you need info on this check out the link on my sidebar called "mock layering" and also this link.

The stamp is from a set called Meadow Breeze by Inkylicious - since our hostesses at LIM also purchased these stamps you will no doubt be seeing more of them. I have discovered that instead of the ink, blot, plot to get the shadow I can stamp with a special formula clear black ink pad from Stampology and although it's black it stamps grey.   I rather pleased about this because I have two of these pads which I bought in America about 8 years ago thinking they were black and cheap and would be a good buy and have never used.  Wonder what else I have stashed away????

I'm doubling up this entry and sending my card to the
Charity Card Monthly Challenge for St.Lukes Hospice.  "Say it with flowers" is the theme and I'm pleased to be able to support such a worthy cause.

ikki

PS:
I forgot to add the sentiment stamp is from Hobby Art No.GR1831BB

Saturday, 2 April 2011

Doodle Stamps from Chocolate Baroque

Now that Chocolate Baroque has gone live and the new stamps are on show, I can show you my artwork using the Doodle Bird, flower and butterfly stamps...

I love the abstract nature of these stamps and used an unusal cardstock mix of lilac with a mat of orange.
First I coloured white cardstock with Distress inks, then stamped the images with Perfect Medium and dusted with various Cosmic Shimmers.
 A delicate but glowing effect.
Nice to do something different!

If you would like to know more about these new stamps check out the link on my sidebar to the CB website, and also there will be other artwork from my DT mates over on the Chocolate Baroque DT Blog.  Again, you will find the link is on my sidebar.  
.

Friday, 1 April 2011

WINNER.....OF THE MANDALA BOARD

We have a winner of the Mandala board from Diamond Card Crafts.....selected from......

True Random Number Generator

Min: 1
Max: 106

Result:
95

Powered by RANDOM.ORG

and the winner is.....  CHERYL WINGET

CONGRATULATIONS CHERYL - can you please contact me asap with your email address, and
thanks Phyllis for your generous gift - I sure Cheryl will enjoy using your board.

Chocolate Baroque goes live!

Hi, today is a big day for Glenda - Chocolate Baroque goes live at noon.  If you are interested in seeing a bit more check out this link: http://chocolatebaroque.ning.com/ and you can also click on the badge on my sidebar.  Perhaps you would like to join us ?