Hi

Hi, Thanks for dropping by.

My name is Eileen but to friends in the card making world I'm known as 'ikki'. (which is pronounced I-KEY) From where or how this came about I'm not sure - it just got shorten from my original craft name of Ikemo by various friends along my crafting way! I started crafting whilst recouperating from an accident, and from my first attempts with peeloffs and paint - I was hooked! Now my passion is my BUG! and now BEADING!

In the Cupboard you will find ideas, news, tips and techniques to help you get more from this fab little machine. So come in - join the fun and Cuttle with me!


Thursday, 31 December 2009

Cuttlebug - 2009 Top Tip No.2

Here we are on the last day of the year and because of the problems I'm having with my PC and a number of nasty viruses, instead of No.1 - I'm on No.2!! But, never mind, I can post No. 1 on the lst Jan which is okay because it's my top tip not only for 2009, but one you will be using in 2010 over and over again!

But back now to No.2 on my favourite list.

Way back in March I posted a tutorial on using my Modifying Folder Pad (MFP). The idea was to increase the use of embossing folders and to eliminate creases and folder lines; to enable border folders to emboss without creases and lines, and to make more use of the small 2" x 2" embossing folders. Just in case you have missed these posts, I think you would find reading them useful. MFP's make life easier and less frustrating - and once you have made them, you can use them over and over.
A little time taken here, will save you time in the future.

The posts are quite detailed so I will not illustrated them again, but give you the links if you are interested. If you go to the side bar - under Labels you will find the all the posts using MFP's - there are 8 in total. Hope you have time to read them - if like me you like to get the best out of your Bug, you will understand why the MFP's are No.2 in my favourites of 2009.

Back tomorrow with my No.1, in the meantime have a great New Year's Eve.


Wednesday, 30 December 2009

Cuttlebug - 2009 Top Tip No. 3 - Make a Pop-up Card with Nestabilities

I just had to add this to my Top Tips List as No.3....Hope you agree?

From my Tutorial in July 2009:

"I have been playing around with my large scalloped circles and discovered that I could make a pop-up card really easily.

This is the method I used. Cut 3 circles.

Fold as illustration - 2 one way and 1 the other and crease well.

Open out and join together so you have this shape


On the inside card crease fold - line up the centre fold of the pop-up
and tape the outer circles to the card

Hey Presto....you have made a pop-up card - I just added butterflies to complete the look.


I decorated the front with 3 butterfly dies embossed with the CB Textile and Swiss Dots folders. The cardstock was embossed with the Frills Flower Border on the front and back and the edges cut with a scalloped Pierceabilitie die."

This card not only uses Nestabilitie dies, but also Butterfly shapeabilities and a Pierceabilitie border die.  My motto is "If you have them - use them".  Are you using yours????

Back tomorrow (hopefully PC permitting - it's being very naughty at the moment) with Tip No. 2


Tuesday, 29 December 2009

Cuttlebug - 2009 Top Tips - No 4

As we near the end of 2009 which has been a busy year for me, I thought I would look back at some of the postings in the Cupboard. I have done so many tutorials and postings that I was amazed and surprised at what I found hidden away and had forgotten about! This led me to think of what I considered to be my best tips of the year and for the next four days I will show you what I consider to be my top 4 Tips for using your Cuttlebug and dies. You may have seen these, but just in case not, I don't want you to miss them!

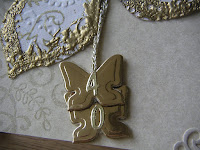
Today my Top No.4 tip has to be using my small dies to make charms for cards. These have proved to be really useful for displaying birthday ages and wedding anniversaries.  You will find more ideas for using these charms under the label: Love and Marriage.

From:  5th July 2009

The last week has been hectic for me but I still managed to make a couple of cards using my Cuttlebug.

At the risk of becoming boring, I have used my Butterfly Shapeabilities to make a completely different card to last week's, because I thought you might like to see just what you can do with the smallest die.


Using a mottled beige cardstock cut to make a 5.1/2" square card, stamp a large swirl in gold ink and embossed with a clear embossing powder. 2 Fancy Corner die cuts finished the base card. Don't throw away the pieces left over - these can be used to decorate inside corners.


For the embellishment I used a thick handmade patterned paper to
cut a large butterfly and embossed this with the Paisley Cuttlebug folder.


To increase the boldness of the butterfly, use a glue stick to add a thick layer of glue to the edges. Cover with gold embossing powder and melt the power and glue with a heat gun.


This is the effect you get.


To complete the butterfly's body use : 2 eyelets and some twisted gold thread. Gold wire and beads for the antennae.
Cut 4 small gold mirror card butterflies.


Attach back to back over the gold thread to make 2 charms on which I have added numbers for this special birthday card.


Still using the Butterfly theme, cut and emboss the larger die - ink the edges and stamp in some way and you have your inside card completed.

The finished card.


I'm sure you will like the charms that you can make
with these small dies. Here I have used the heart dies on this Diamond Anniversary card.
Simple but very effective embellishment!


Hope you'll have time to drop by tomorrow for Top Tip No3.

Monday, 28 December 2009

Updating the Cuttlebug Cupboard

When I started this blog back in January, I had no idea of where I was going or what I would be doing. Now at the end of the year, I find that The Cupboard has become a useful source of reference for using the Cuttlebug and other die-cut machines. However, with hindsight, I need to make it easier for visitors to find their way about to actually find the information that has become hidden with so many posts. So, over the coming days I will be making a few adjustments - that is if my troublesome PC will switch on when I return home on the 29th.

I will also be looking back at some of the (in my opinion) most useful tips and techniques that I have illustrated in my 2009 tutorials. I hope you'll be able to join me and let me know what have been the most useful ideas for you. I think this will be really useful for new owners of the Bug, and I know from pm's received that this Christmas has certainly been Bug friendly!

Join me tomorrow for my Top 4 Tips of 2009......?!!??.....

Sunday, 27 December 2009

Well it's all over!

After all that work and preparation Christmas 2009 is over! I hope you have all enjoyed a peaceful and happy time with your loved ones...and now we crafters can move on...not, however, forgetting the Christmas theme because there are the SALES!!

I've spent Christmas in Edinburgh and yesterday (yes Boxing Day) the sales began, but alas no Craft Shops! Still there is the internet, so no problem - I'm sure we will all find a few things to buy! If you find anything interesting - I'd love to hear from you. I cannot make up my mind about Copics, Promarkers, or Distress inks, but I did find a super book in Waterstones on coloring flowers, so now I know how to, I just need to know what with? Any advice to help me decide would be appreciated.

Wednesday, 23 December 2009

Merry Christmas to all

To all my crafting friends


When you creep downstairs on Christmas morning, I hope you find Santa has left you lots of lovely crafting goodies!


Wishing you all a very Merry Christmas and a Happy New Year.


Sunday, 20 December 2009

Cuttlebug and Magnetic Mats

Using a magnetic mat in your die cutting machine can be a useful way of making frames and apertures in your cards. Since I'm frequestly asked if they are needed; about the sandwich; and just how to do this .... today's card will show you the method I use.

Making an aperture card
I started by making a 4" x 4" card, which I scored round four sides.
Any make of die will make your aperture.  Tape the die to the inside of the card - cut side down - use a low tack tape to secure.
Place the magnetic mat inside the card
and fold the front card over securing the die on the magnetic mat.  Run through the Bug....

Sandwich:  A plate/card encasing the dies and mat/Shim/2 B plates  (I have to use 2 shims, BUT your machine might need less or more..TRY a test run...NEVER force....BEST to start with a thin sandwich).

and you have your aperture card.

You could achieve this result without a magnetic mat, but without the mat you get an impression on the back inside of the card.

Making a frame using a magetic mat

The mat is really useful for making frames


Place the dies on the magnetic mat - place your paper or card over the dies and run through the Bug.
The sandwich is slightly different than usual
A plate/magnetic mat with dies cut side up/paper/ 2 B plates
 (dependent on your machine possibly a shim on top).

In the picture you will see the frame fixed to the aperture card. 
To finish my card I only had to cut a piece of matching paper and add to the inside of the card.
  I also added a a silver thread and  beads. 
The remaining piece of the cut-out can then  be added  to the inside of the card.
It was my intention to use the cut-out from the aperture also on the inside, but after stamping with care and putting on one side to dry....it disappeared....yet to be found!

As you can see magnetic mats to have their uses.

Another such use is to emboss a frame on the front of your card, you can check this out here.
I have used a very quick and easy way of decorating the aperture - the choice is yours!

I have not added a sentiment - this type of card could be used for any occasion, but I thought with Christmas nearly upon us - it would make a very nice Thank You card, should I received a present!


PS: From a query received from Merry: You can buy magnetic mats from many suppliers, the link on the side bar is my supplier. The mats Liz supplies are her own NOT a Spellbinder product and so are much cheaper. They are very magnetic so that the dies hold firm - some mats are much thinner and are only suitable for storing dies. Also the dies do not cut the mats because the cut side is face up. Hope this makes sense and answers some of the points I omitted. ikki

PPS:  Question from Kim:  Can you use the tan mat instead?  NO.  The tan mat does a completely different job - Embossing.

Thursday, 17 December 2009

Tippy Thursday - Ribbon

Be it wide; thin; plain; striped; polka dot; satin or whatever, ribbon plays a big part in our crafting. BUT, it can become a box of tangled mess!

So how to store? I have seen boxes and bags with holes round the sides, so that the ribbon can poke through and  be pulled out! But I think you  will still get tangles - am I wrong? Tell me please! Or if you have a better storage system, again I'd love to know and so would others!

For myself I have a very simple storage for ribbon, not perfect (I still get tangles at times) but it works reasonably well for me. Self sealing sandwich bags - cheap and cheerful (50 for £1 at tool box). You can see at a glance what you have without having to open the bag. I have a bag for each colourway and they sit in a row in a storage box. It works okay if you remember to re-seal the bag!

I know a lot of crafters have a Bow Folder, they do work and tie very neat bows, but as anyone made their own? I have set a task for my dear hubby, something to do during the cricket lunch break!!!  Hopefully, fingers crossed, I will have one to show you soon.....and some neat bows!

Talking of tangles reminds me that I heard a great tip on C&C from Sheena Douglas the other week.  If your ribbon has  kinks or  folds that need ironing, you don't need an iron if you have hair straighteners!  I have tried this and it's much quicker than getting the ironing board out and waiting for the iron to warm up.  Anyway when the boards up I have guilt pangs knowing I should really be sorting out the ironing basket not ironing ribbon! 

Another tip.  If you have a down ribbon and a cross ribbon and want to add a bow over the crossing ribbons - you can use invisible thread to  pull two ribbons together.  Knot the thread, make a bow and add over the knot.  Neat.

 Love to hear your ideas and tips on ribbon. 

Now I'm working on using magnetic mats - back very soon with my results and some pics.

Tuesday, 15 December 2009

Spellbinders - Shapeabilities Create a Flake 2

On a very grey day I have a bright, cheerful card for you made with gorgeous paper and the Create a Flake die.
For the card:
Spellbinder Create a Flake Dies
5.l/2" x 5.1/2" Card
paper
Gems

Having covered the front of the card with your paper, (I continue the paper over to the back for a neat finish), you are ready to make your flake
Such a pretty and useful die!  You can use all 5 dies together or on their own.  They emboss well, and on this card had another use - cut-outs.


So, you not only decorate the front, but also the inside.  Cool!

Another quick, but impressive Christmas card, courtesy of the Spellbinder's Flake.  Not forgetting the lovely paper which I managed to cut into for once!  Alas my stash is now minus one, but on the bright side I can buy another to replace it!!   Always look on the bright side - sounds a good motto for 2010!!!  I will try - what about you?

Monday, 14 December 2009

Nellie Snellen Christmas card

Since it's time to get those last minute Christmas cards made, I thought I'd whisk up a little card for you using the Nellie Snellen Frame dies. These dies are proving to be very useful.

For the card:
8" x 4" Red card
1 Middle NS frame cut from red card and emboss with Crafts-two-you Snowflake folder
2 Small NS frames die-cuts from Basic Grey Paper and red card
Holly stamp
Wire, embellishment,
Perfect pearls

Centre crease and fold card.  Stamp edges for interest - I used a Holly stamp and dusted with gold metallic perfect pearls.
Cut one middle sized frame and one small frame from the red card.  Then one small frame from the BG paper.  To stop the cut-out bits falling out - tape the back.   If you do push out the cut-out bits - tip - do it over a bin or you 'll be getting the hoover out!


When assembled - a two tone effect.


The finished card


I think on reflection that a two-tone effect would have looked good on the back frame!  I do like these 4 x 4 cards - hope you do too! 

I'll have another card for you tomorrow - thanks for dropping by.

Friday, 11 December 2009

Information on Buying Dies - Spellbinders Nestabilities/Nellie Snellen

Hi, I realise that due to the many posts that I do, that some of the info gets lost! Since many peeps are looking at buying dies (or hopefully having dies bought as presents) I thought I would make the research I did on buying and sizes of dies more easy to find.

So, now in the Cupboard side bar (on the right), Under Labels, just click on Dies - info and sizes.

I will also do the same for info on Embossing Folders, but this may take me awhile, so please be patient with me!

ikki

http://ikkiscuttlebugcupboard.blogspot.com/

Thursday, 10 December 2009

Tippy Thursday - Nellie Snellen and tips on how to avoid lines

Hi, Today I'm going back to my TT. (tippy Thursday) post. I started this post wayback to help  new and experienced Cuttlebug users overcome promblems and also to learn of new ways of using the Bug. In this post I also pass on info on new products, tips and techniques that I heard about and think will be interesting to fellow crafters. I'm also pleased to pass on your tips and comments, so if you have something you would like to share...just let me know...and it will be done!

Today I thought I would show you a few pics of the new Nellie Snellen Frame Dies.


I have used the Rectangle - this gives a very fancy die-cut frame,


but you could also be used to the die to make a mat. Indeed, you could die-cut a mat, then a frame to fit over the top, add your embellisment inside the frame and you have a super topper!  I have just thought of this and will have a go later and see how it turns out!!!

Recently, I received a query from Jo (Kinglake) on how I avoided join-up folder lines when using a folder to make a second embossing on a card..   The way I overcome this problem is to make a Modifying Folder Pad (Check out the tutuorials  under Labels on MFP on the side bar).  The pad is slightly smaller than the folder so that no pressure is put on the edges of the folders when embossing. Bit a bit of a nuisance to do, but once done you can save for future use and the bonus is NO LINES!  This was a technique that I developed  back in Feb/March because I hate line marks, so if you go back you will see that you can utilise this method for borders, or for making borders with the 2 x 2 folders.  Hope this helps Jo. 

Now I'm off to see if I can make another card using the NS frames and mat?!?!? Have a good day and thanks for dropping by.


PS: If you are interested in the NS dies - check out my supplier on the side bar. I can recommend this lady as a fair, competent and reliable trader.