
Embossing folders can be used in different ways - you can emboss a mat and layer on your card, or you can emboss direct on to your card. This is the method that I favour. To get more use out of your folders you could try this......

This picture show the positioning of the folder. Doing it this way enables you to get the folder right up to the centre fold - the card and folder are then past through the Bug.

This is a card made using this method. Thinking of you and sympathy cards are already difficult. You want to say something, but not go over the top. Simplicity is my answer!
Folder: Swiss Dots
Image: Chris Dark - Bluebells - partial coloured
Distress Ink: Weathered Wood
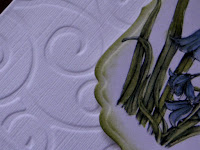
This next card is again made using the same method with the same image coloured differently, but a different folder.

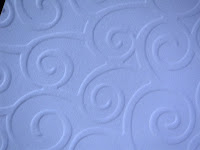
The folder is D'vine Swirls - a great around folder for any occasion. But, here again you can ring the changes
Here is the embossed pattern that is mostly used.
This is the debossed pattern which I have used for a different look.
Not all folders can be used sideways on your cards, some patterns like leaves, birds or hearts would be going the wrong way! You can, however, use folders from the bottom, but this does mean having to cut the joint, but it can be retape! The small 2" x 2" folders are more useful if separated (check out one of my anniversary cards on the Labels sidebar: Love and Marriage) - but warning retape them after use or you could lose the pieces!
Have a good day....


This is the debossed pattern which I have used for a different look.

Not all folders can be used sideways on your cards, some patterns like leaves, birds or hearts would be going the wrong way! You can, however, use folders from the bottom, but this does mean having to cut the joint, but it can be retape! The small 2" x 2" folders are more useful if separated (check out one of my anniversary cards on the Labels sidebar: Love and Marriage) - but warning retape them after use or you could lose the pieces!
Have a good day....
8 comments:
Hi Ikki, love the idea of turning the folder around so I can emboss to the edge, thanks for the tip, new to the Cuttlebug (only got it on Saturday) and already I love it looking forward to reading through all your posts and seeing what other tips and tricks I can find.
Great info Eileen
Gorgeous and very effective, will be having a go when I get home.
Hugs Fiona x
Thanks for this. I haven't got a Cuttlebug, but use your ideas to achieve these effects with my Bigshot. Your tutorials are invaluable and have helped me to get a whole lot more out of my machine - so once again thank you for sharing.x
another great tip - will use this today on cards i am making for Cancer Research. thanks for sharing xx carole
Hi Eileen, just been checking out the Provo cuttlebug page on Facebook..have you heard abt the new 12inch plates for the 'bug along with new embossing folders & dies like the nestabilities? looks interesting x
Thanks for this, Ikki - I'm a new Cuttlebug user, and at the moment I'm making some cards to act as holders for the ATCs I'm making - after embossing with the Cuttlebug folder and scoring the lines with my Scor-Pal, I've cut a slit across the middle. I have backed the inside of the front of the card, and put the ATC into the slit on the front. The white embossed card is a good background, and I can then write or stamp the sentiment in the smooth part at the bottom of the card, in a colour to co-ordinate with the ATC. This is going to prove a very useful way to produce a special card quickly - one often gets a sudden demand for a card and no time to make one! It wouldn't take long to add a sentiment, and if one has got a stock of these folders and various ATCs already made, it should be a doddle!
I'm about to put a couple of photos of them on my blog, and I'm doing a video too, and will put a credit for you on it. Thanks for all the useful tips!
Shoshi
Just looked at your card samples in your gallery...simply awesome! I didn't know there could be such beautiful results with the cuttlebug. I'm so glad I have one! Thank you for sharing.
Post a Comment