These are examples of what you can achieve.
To get this effect you will need:
Die(s)
Tan embossing mat
Magnetic mat
Good quality cardstock (hammer, leather embosses well - with a thin card the dies may cut instead of embossing).
This is your card - centre scored - with right side of the card facing upwards.
On the back of the card
place the magnetic mat with the die is position. The die has to be cut side up or it will cut the magnetic mat.
NB: You will find that it is better to have the correct size mat for the card size. This make positioning the dies easier and more accurate.
Now bring the front side of the card over
encasing the magnetic mat in the card.
The Tan Mat sits on top
NB: It is important that you only use the Mat Tan for this process. The tan mat stops the die cutting an aperture.
Now you can make your sandwich:
A PLATE / B PLATE / CARD ENCASING DIES ON MAGNETIC MAT / TAN MAT / B PLATE
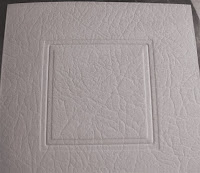
This is the effect of embossing with one die
with two dies
With a few little touches you can make a simple stylish card.
The magnetic mat is very useful for this embossing technique, and if you are making wedding invites where you want the embossing in the same place on every card,it is definitely a time saver.
Hope you like this idea of getting more out of your dies.

NB: If you are looking for a tan mat - check out the shop on my side bar.


17 comments:
Hi, thanks so much for the info, you make it so easy to follow,and I love the look it gives, thanks again,
Hugs Liz xx
This is great Ikki!
Love the effect.
Where do you get your magnetic mats from? None in the ebay shop you mention!
Kathleen xx
Hi Ikki
Thanks for the tutorial, I am just about to make a 'new home' card and think I will use this technique - it will be my first time - will post later.
Paula x x x
Oh these look fab Eileen, I must give this a go, and hopefully it will be less messy than the Perfect Pearls!!
Fab tutorial might go and have a play but will have to use low tack tape for now. Thanks again Eileen. Louise Score DC
Hi Ikki,
thanks for this super tutorial, I have magnectic mats so I will be giving this a try.
I have heard you can also use magnetic mats to cut an aperture in your card. If this is so, I would appreciate a tutorial please.
Hugs
Christine xx
Thanks for this Ikki, so useful, have all the tools but no idea how to use them!!!
HI Eileen....such wonderful cards...love the little bit of beading you have done. This is a great tutorial with all the photos. Maybe it's too early for me and the caffeine hasn't kicked in but how come the card doesn't get cut. In photo two are those dies on the magnetic mat with the cutting ridge facing up and flat side on the magnet? Thanks for your help.
Thanks so much for the extra words in the tutorial Eileen. I think the coffee has kicked in now too. So now I am thinking that by having the tan mat on top it takes the press away from the card and allowing it only to be embossed instead of cut all the way through. Now to get a magnetic mat.
what embossing folder did you use for the leather look card my email is pandb111@comcast.net
Pat
thanks, ikki, I've been using nesties for a long time and often wondered how it was done. thank you for sharing.
These are just yummy... so elegant. I love the effect and I love them!
Chrissie
Hi Ikki,
LOVE this idea for keeping the nesties in one place. Would work SO much easier than sticky tape.
Is the Magnetic Mat made by Spellbinders? The Spellbinders one that I can get here in Australia is white and called "Spellbinder Magnetic Spacer Plate" (see this link to see a pic of it: http://www.bizzybecscardmakingscrapbooking.com.au/index.php?main_page=product_info&products_id=3103 - but the one in your pic is black - is it the same thing or a different brand? Just a bit unsure of what I should buy. Hope you can help :-)
Love the embossing on the front of the card. The magnetic mat really gives it a super effect. Problem now is to find one.
Just not sure where I can get a magnetic mat in Canada.
Hi Ikki, great tip with a wonderful result, will try it when I found my magnetic mat.......where oh where, greetz Miranda
Thank you Ikki for this great idea...You are so creative.. Can you please explain how do you make the little roses etc that you have attached to these cards.. regards Pat
Post a Comment